Traditional poppy-seed roll

’Tis tough to grind poppy seeds to a paste,
By mixie or by any means in haste;
Such is the grittiness of seeds tho’ small,
Invincible a foe, need not be tall. (J. Celes: Poppy seeds)

The poem proves two things: First, you can clearly make up a poem about just about anything, and second, to bake this traditional Central and Eastern European pastry you’ll need some elbow grease. Tiny black poppy seeds, harvested from dry seed pods of the poppy plant, are widely used in various cuisines around the world, mostly for decoration on top of baked goods. The pastry I want to show you today is different, in that the poppy seeds won’t be just modestly sprinkled here and there to add visual appeal and texture. In this traditional yeast roll they really take center stage, and we’ll need a lot of them, which is where the elbow grease comes in. (Did you know it takes between one and two million of seeds to make up a pound? I love to collect these utterly useless bits of culinary information.)

To make the filling for the roll, the seeds first need to be ground to a paste. Most Slovak bakers still use a hand-cranked grinder for this task, which gives the seeds a perfect consistency. I’ve got such grinder too, and use it often, given that I also have two teenagers and their manly strength at my disposal. The resultant poppy-seed paste is then sweetened and flavored with many wonderful things – sugar, cream, honey, lemon, and vanilla, to name a few. It seems that every region has its own recipe for the filling, and even every baker adds his or her own special touch to it. (I like to add a dollop of a tart jam and a handful of raisins, because everything is better with raisins, especially if they’re soaked in rum first). When you’ve played with the filling and made it so lip-smackingly delicious you can’t stop nibbling at it, it’s time to roll it up in the sweet dough and hide it away in the hot oven. Many good things come to those who wait, and in this case, if you can hold off for just half an hour, out of the oven emerges this shiny, sweet pastry that you can eat for breakfast, snack, or a dessert. The filling is usually just rolled up in a dough jelly roll style, and the pastry is then given a coat of egg wash and baked until golden. I changed it up a bit, and decided to cut the dough into strips and wrap them around the roll.  Not only it makes the pastry more interesting, but because the strips provide an additional layer of dough around the roll, there is less risk the roll will split open during its rise in the hot oven. I’m quite happy with the results, and from now on it will be my go-to method of making the roll.

Even though many Slovaks (and Czechs, Poles, Croatians, Ukrainians, and Russians for that matter) are very fond of poppy-seed desserts and  can’t imagine holiday table without them, poppy seeds have a very distinctive taste that people tend to either love or hate. For those who can do without them, I’m offering an alternative walnut/pecan filling, which is made exactly the same way. There is really no reason anyone should miss trying a slice of this homemade buttery goodness.

img-2015-02-08-5864

Traditional poppy-seed roll

(makes 2 small or 1 big sweet roll)

Dough:
  • ½ cup milk, lukewarm
  • 40 g (5 tablespoons) icing sugar
  • 2 teaspoons active dry yeast
  • 250 g (2 cups) all-purpose flour, plus a little more if needed
  • pinch of salt
  • 60 g (¼ cup, 4 tablespoons) unsalted butter, softened
  • 1 large egg yolk
  • 1 teaspoon vanilla extract
Poppy-seed/Nut filling:
  • 250 g (9 oz.) ground poppy seeds (or ground walnuts/pecans)
  • 250 g (9 oz.) icing sugar
  • 100 g (3.5 oz.) honey
  • 1 tablespoon of tart jam (raspberry, currant)
  • 1 teaspoon lemon juice
  • 1 teaspoon vanilla extract
  • 1 teaspoon cinnamon
  • ¼ – ½ cup milk (or cream)
  • ½ cup raisins, soaked for 30 minutes in ½ cup water with ½ cup rum, then drained

+ 1 egg yolk with 2 tablespoons of milk, for egg wash

Method:
  1. To make the dough: In a small bowl, mix the lukewarm milk, yeast, and pinch of sugar. Let stand for 15 minutes to activate the yeast.
  2. In a bowl of your stand mixer, mix all the remaining ingredients for dough. Add the yeast mixture, and knead for 10 – 15 minutes, until the dough is smooth and elastic. If it’s too sticky, add a little more flour, 2 tablespoons at a time; if too dry, add a little milk/water to achieve the right consistency.
  3. Transfer the dough into an oiled bowl, cover, and let rise in a warm spot until it doubles in volume, 45 minutes – 1 hour.
  4. While the dough is rising, prepare the filling:  In a small saucepan, combine all the ingredients except milk (cream). Over a low heat, gradually add milk or cream to achieve soft paste-like consistency. Let cool at a room temperature, don’t chill (room temperature filling will be easier to spread).
  5. When the dough has risen, punch it down and divide it into two equal parts. On a floured surface, roll one part of the dough into a 7 x 9 inch rectangle, keeping the other half covered.  Position the rectangle crosswise to the work surface, short side close to you, and spread half of the filling on two thirds of the rectangle, leaving the last third empty. Pick up the shorter side of the dough rectangle, and roll the two thirds into a jelly roll, enclosing the filling, but don’t roll all the way.
  6. Cut the last third of the dough into strips about ½ inch wide, and wrap them around the roll. Pinch the ends of the roll together or tuck them under to prevent the filling from leaking.
  7. Transfer the roll seam side down onto a parchment lined baking pan, cover with a towel, and make the second roll in the same fashion.
  8. Allow the rolls to rise again, covered, while you preheat the oven.
  9. Center a rack in the oven and preheat it to 350 °F (170 °C). Prick the top of the rolls with a fork to prevent splitting, brush the pastries with egg yolk mixed with milk, and bake for about 30 minutes until dark golden brown.
  10. Cover the rolls with a clean towel while cooling to keep them soft. Let cool completely before slicing.

Tiramisù cake

There are two things that fascinate me: the culinary world and the world of words. Ever since I was a little girl, I loved to play with words and write my own little stories. I didn’t need much to be happy – just a sheet of paper and a pencil was enough. Later I ditched the pencil and picked up an old typewriter that I dragged with me everywhere. I remember always having black smudges from touching the ribbon with my fingers, and dreaming of becoming a journalist. Fast forward a couple of years,  I was at a university studying Italian and planning to be a translator. Funny how life often takes us on journeys we’d never imagine for ourselves. You fall in love, and before you know it, you just landed on another continent, and can forget about Italian, because, well, nobody speaks it here, so you better pick up the language of these people if you want to survive, and do it fast.

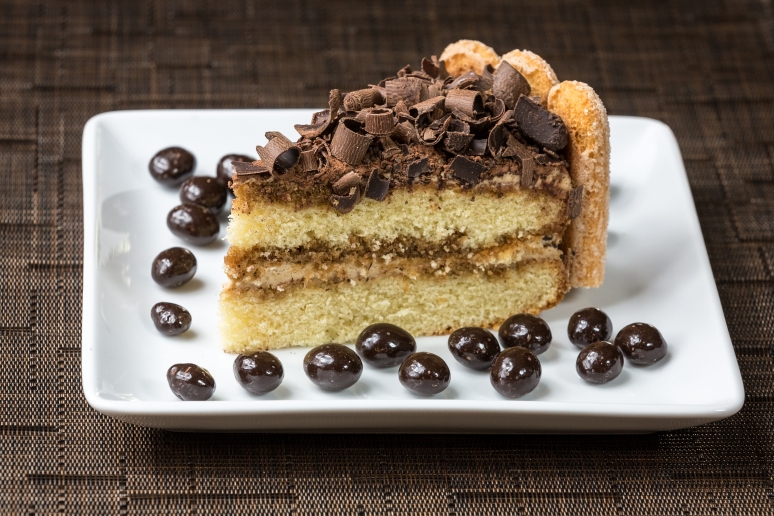
I still have a soft spot for Italy and love anything Italian (well, anything but Italian driving style, really 🙂 I adore those small towns with narrow streets, countryside with vineyards ready for harvest, charming cafes at every corner, the wine, pasta, and gelato. I visit whenever I get the chance, and in the meantime, I often try to create  little Italy in my kitchen. The word tiramisù means “pick me up”, and that’s exactly what this popular dessert does for me. The combination of coffee dipped ladyfingers, creamy mascarpone filling, and generous dusting of cocoa is rich and decadent. There are countless variations of tiramisù, each one of them delicious. My version includes two-layer sponge cake, which I feel can stand up to the soak in espresso better than ladyfingers would. The ladyfingers pressed in a ring around the cake play more of a decorative role, and tied up with a ribbon make the cake look very festive.

A great treat for a birthday celebration, family gathering, or anytime you could use a little pick-me-up in your life.

Tiramisu cely

Tiramisù cake

(adapted from Dorrie Greenspan’s Baking: From my home to yours)

Cake layers:
  • 8 tablespoons (1 stick) unsalted butter, softened
  • 1 cup white sugar
  • 3 eggs + 1 egg yolk, room temperature
  • 2 teaspoons vanilla extract
  • 2 cups cake flour
  • 2 teaspoons baking powder
  • 1/8 teaspoon baking soda
  • ¼ teaspoon salt
  • ¾ cup cream (or buttermilk)
  1. Preheat the oven to 350 °F. Butter/flour two 9-inch cake pans, and line them with parchment paper.
  2. In a small bowl, mix dry ingredients together. Set aside.
  3. Cream together butter and sugar. Add eggs and egg yolk, one at a time, mixing well after each addition.
  4. Add dry ingredients to the egg mixture, mixing just until combined.
  5. Lastly, mix in the cream (the batter will be quite thick). Divide the batter between prepared pans, smooth out the top, and bake for 30 minutes, until the cake springs back to the touch and the toothpick inserted into the center comes out clean. Invert the cakes onto cooling racks and let cool completely.
Espresso extract:
  • 2 tablespoons instant coffee
  • 2 tablespoons hot water

In a small bowl, mix coffee and water together and set aside.

Espresso syrup:
  • ½ cup water
  • 1/3 cup sugar
  • 1 tablespoons Kahlúa (coffee liqueur)

In a small saucepan, boil water and sugar together. Turn off; stir in 1 tablespoon Kahlua and 1 tablespoon espresso extract. Set aside.

Frosting:
  • 226 g (8 oz.) mascarpone cheese
  • ½ cup powdered sugar
  • 2 teaspoons vanilla extract
  • 2 tablespoons Kahlúa
Stabilized whipped cream:
  • 1 cup heavy cream
  • ½ cup powdered sugar
  • 1 teaspoon unflavored gelatin
  • 4 teaspoons water

+ unsweetened cocoa powder, about 30 ladyfinger cookies, shaved chocolate and chocolate covered coffee beans for decoration

  1. In a bowl, gently mix all the ingredients for the frosting until creamy. Set aside.
  2. Mix 1 teaspoon gelatin with 4 teaspoons water; let stand for 10 minutes, until the gelatin absorbs all the water. Then heat the gelatin mixture over a pot of hot water, until the gelatin dissolves (be careful not to boil it). Let the gelatin syrup cool till lukewarm.
  3. In the meantime, whip the cream with sugar until very soft peaks form. Still mixing, carefully pour in the cooled gelatin syrup, and whip until stiff peaks form.
  4. Gently fold whipped cream into the frosting.
To assemble the cake:
  1. Level the cakes with a cake leveler/serrated knife if needed.
  2. Place one cake on a plate and using a pastry brush, soak it with 1/3 of the espresso syrup. Spread the cake with 1/3 of the mascarpone-cream filling.
  3. Soak the other cake layer with another 1/3 of the espresso syrup, and place it soaked side down on a filling; gently press down. Sprinkle the top with the remaining 1/3 of  the espresso syrup. Finish frosting the top and the sides of the cake.
  4. Dust the top liberally with cocoa. Press the ladyfingers all around the cake. Decorate with chocolate shavings if desired.
  5. Chill the cake until serving. Can be made the night before, to give the flavors time to meld.

Tiramisu slice

On Yeast Dough

I already professed my undying love for a yeast dough. I love it in any shape or form – being it basic whole grain bread to accompany a filling soup, hearty artisanal loaf, or egg-enriched buttery sweet bread. I have to say, though, that it definitely wasn’t love at first sight on my side. My first encounters with yeast dough were rather frustrating, and I don’t care to count how many pounds of flour and butter ended up in the trash during my early experiments. Many, many times I swore to never touch yeast ever again, and yet not even a week went by, and I was back in the kitchen trying once more.

Looking back it’s clear to me now that I simply didn’t understand basic principles of working with yeast dough. Ever since I first set my foot into the kitchen many moons ago, cooking and baking has been more or less a play for me – let’s fire up that pan, toss a little bit of this and a little bit of that in, and see what happens. Well, yeast dough doesn’t work that way. It can be a little fussy, like a high maintenance girlfriend/boyfriend – you need to be careful in its presence, handle it with care, and give it time and attention it requires. But once you understand what it needs, it pays you back, and a whole world if endless possibilities opens up in front of you. And you can start playing again, adding a little bit of this and little bit of that, and you’ll be rewarded with surprisingly delicious results every single time, I promise.

Many people seem intimidated by yeast dough, even though they really don’t need to be. There are only two things you need to keep in mind when working with yeast dough: temperature and time. Every dough starts with just three key ingredients: flour, liquid, and yeast. After you mix them up, the yeast starts feeding on the sugar and makes carbon dioxide bubbles that get trapped in the dough and make it rise. When activating the yeast, you need to use liquid that is just the right temperature – not too cold, or the yeast won’t “bloom”, and not too hot, or you’ll kill it, and your dough won’t rise. The liquid should be just lukewarm (100 – 110 °F, 37 – 43 °C). Adding a little sugar helps the little beasties to wake up and start doing their thing. After about 10 minutes, the yeast mixture will look foamy, and you’ll be ready for the next step. You mix in the flour and all the other ingredients according to your recipe, knead it until it’s soft, smooth, and elastic, and there you have it – your basic yeast dough. Now the only thing it needs is time, so that it can show you its magic and double in volume. Once it does that, you’re free to shape it any way you want. And after shaping and a short second rise, you slide it in the hot oven, and you can get ready to be amazed.

Key ingredients in yeast dough:

1. Yeast (fresh or instant; I prefer instant which is more reliable)
2. Liquid (water, milk, whey, buttermilk, potato water, or a combination)
3. Flour (bread flour which has higher gluten content, all-purpose flour, whole wheat, rye)
4. Fat (optional, depending on the recipe – butter, olive oil)

My basic recipe:

• 250 ml (1 cup) milk
• 1 teaspoon sugar or other sweetener
• 2 ½ teaspoons active dry yeast
• 450 – 500 g (1 lb.) all-purpose flour (or bread flour)
• 1 teaspoon salt
• 2 egg yolks, room temperature
• 56 g (1/4 cup) unsalted butter, softened

If you want to make a sweet yeast pastry, add:
• ½ cup white sugar
• 1 teaspoon vanilla (optional)
• 1 teaspoon lemon zest (optional)

Method:

1. Heat the milk until lukewarm, add sugar. Sprinkle in the yeast, stir, and set aside for about 10 – 15 minutes to activate the yeast.
2. In the meantime, put all the other ingredients in a bowl of your stand mixer, fitted with a dough hook.
3. After the yeast mixture looks foamy, add it to the ingredients in the bowl, and start mixing at a low speed. The dough should start to come together pretty quickly. If it seems too dry, add a little milk/water (not too hot), if it’s too wet, add a little flour, one tablespoon at a time.
4. After a couple more minutes, the dough should start pulling away from the sides of the bowl and forming a ball. Continue kneading for another 10 – 15 minutes, until the dough is soft, smooth, and elastic.
5. Turn the dough ball into an oiled bowl, cover, and let rise in a warm spot 45 – 60 minutes, until doubled.
6. Shape the dough: For bread, form the dough into a loaf, and place it seam side down into a buttered loaf pan. For rolls, divide the dough into pieces, each weighing about 100 – 150 g (3.5 – 5 oz.) and place them onto a lined baking pan. Let the bread/rolls rise again, while you preheat the oven. Give them an optional coat of egg wash, and bake at 350 – 375 °F for 20 – 25 minutes for rolls, and 40 – 45 minutes for the bread.

Cinnamon rolls fresh from the oven, made using the recipe above

Cinnamon rolls

Raspberry Vanilla Mousse Cake

To tell the truth, I’ve never cared about Valentine’s Day too much. I dislike all the commercial hype that makes men feel like a failure if they don’t come through with something big. I hate the crowded restaurants, overpriced flowers, and all the pressure surrounding it.

My man knows I’m not into sappy cards, and I kill plants with a mere look (can I claim that as my superpower?) So he doesn’t need to bother going to Hallmark and can save a pot of mini-roses by leaving them at the store instead of bringing them home. Even though nothing is really expected, chocolate is always welcome 🙂

All that being said, I’m glad I have the special someone to boycott Valentine’s Day with. Every year I’m reminded of just how lucky I am.  Even if only for said reminder, and the opportunity to step into the kitchen and make something new and yummy, I say the sentimental Hallmark holiday is worth it.

So let’s celebrate. Let’s make food. Because food is LOVE, after all.

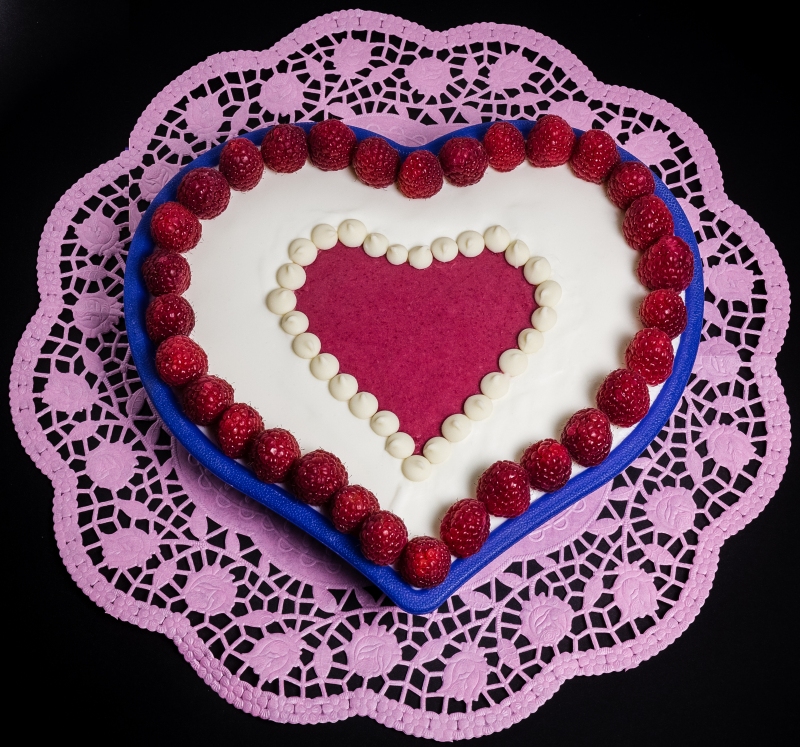
Raspberry Vanilla Mousse Cake

Raspberry Vanilla Mousse Cake

Vanilla cake:
  • 3 eggs, room temperature
  • 70 g (2.5 oz..) white sugar
  • 1 teaspoon vanilla
  • 3 tablespoons hot water
  • 80 g (3 oz.) all-purpose flour, sifted
  • 1 ½ teaspoons baking powder
Raspberry mousse:
  • 5 g (2 teaspoons) of Knox unflavored gelatin
  • 50 ml (¼ cup) water
  • 250 g (8 oz.) raspberries, fresh or frozen
  • 40 g (1.5 oz.) powdered sugar
  • ¼ cup heavy cream
Vanilla mousse:
  • 9.5 g (4 teaspoons) of Knox unflavored gelatin
  • 140 ml (4.7 oz.) water, divided
  • 2 sachets vanilla sugar, or 2 teaspoons vanilla extract, divided
  • 70 g (2.5 oz.) white sugar
  • 472 ml (1 pint) heavy cream
Method:
  1. Preheat the oven to 350 °F. Line a 10-inch (26 cm) silicone heart pan or springform pan, and butter/flour the sides.
  2. In a bowl, mix flour with baking powder and set aside.
  3. Beat whole eggs with sugar and vanilla until thick and light yellow in color, about 5 minutes. Add hot water and continue beating for another 2 – 3 minutes.
  4. With a rubber spatula, fold the dry ingredients into the egg mixture. The batter should look fluffy and aerated. Pour into a pan, smooth out, and bake for about 15 minutes, until a toothpick inserted into the center comes out clean.
  5. Let cool in a pan for couple of minutes, then invert onto a cooling rack. Let cool completely.
  6. When the cake is cool, return it into a washed pan, and place a heart shaped pancake/egg mold in the center. Set aside.
  7. Make the raspberry mousse: Cook the raspberries with the powdered sugar in a pan for about 5 minutes. Let cool slightly and puree in a blender until smooth. Pour the mixture into a bowl and set aside.
  8. Combine gelatin with water, let stand for 5 minutes to bloom. When the gelatin absorbs the water, heat it in a water bath until it dissolves, stirring constantly. (Be careful not to cook it, it needs to be hot, but not boiling.) Set aside and let cool until lukewarm.
  9. While the gelatin mixture is cooling, whip the cream until soft peaks form. Set aside.
  10. Stir the lukewarm gelatin mixture into the raspberry puree.  When the raspberry gelatin mixture isn’t warm anymore, but hasn’t started to gel yet, gently fold in 2 – 3 tablespoons of whipped cream.
  11. Spoon the raspberry mousse into the heart mold, smooth out. Refrigerate until firm, at least 4 hours. (I chilled overnight, and continued on the next day.)
  12. When the raspberry heart is set, run a hot knife around the edges of the mold, and remove the mold. Put the cake in the freezer while you make the vanilla mousse.
  13. Vanilla mousse: Sprinkle gelatin over 70 ml of water, let bloom for couple of minutes.
  14. In a small pan, combine sugar in the other 70 ml of water;  stir over low heat until sugar dissolves completely. Take off heat, and add the bloomed gelatin. Stir to combine, and let cool until just lukewarm.
  15. While the gelatin sugar syrup is cooling, whip the heavy cream until soft peaks form. Take the cake out of the freezer.
  16.  Pour the barely lukewarm gelatin mixture into the whipped cream, stir to combine (mixture will be pourable – that’s exactly what we need.) Pour the vanilla mousse into the pan, taking care when pouring around the raspberry heart. Because the white mixture is liquid, it should distribute evenly and smooth out on its own.
  17. Put the cake in the fridge again, and chill for at least 4 hours, before inverting it on a serving platter. Chill until serving time.
Note:

The quantities listed are enough for a 3-layered cake made in a 9-inch round springform pan. For the heart cake in the picture, I used roughly half of the raspberry mousse and had vanilla mousse left over as well, so I just put the rest in alternating layers into glasses.

When making a 9-inch round cake, prepare the cake base as listed in the recipe. Bloom the gelatin and dissolve it in the hot sugar syrup. Then measure the sugar-gelatin syrup, and divide it into two equal parts. Whip 236 ml (½ pint) of heavy cream with 1 vanilla sugar/1 teaspoon of vanilla extract until soft peaks form, and combine it with 1 half of the lukewarm gelatin-sugar syrup. Pour onto a cake in the pan, and put in the fridge to firm (about 15 minutes should be enough). Spoon the raspberry mousse on a first white layer, chill until firm again (the raspberry mousse was firming up more slowly, so you’ll probably need to wait longer). For the last layer, whip the other 236 ml (½ pint) of cream with 1 vanilla sugar/1 teaspoon of vanilla extract until soft peaks form, and combine it with the other half of lukewarm gelatin-sugar syrup. (The gelatin-sugar syrup will firm up while you’re waiting for the raspberry mousse to gel, but don’t worry – you can easily liquefy it again over a pot of hot water. Just stir it constantly while you warm it and be careful not to boil it.) Pour the last white layer on a firmed up raspberry mousse, and chill for at least 4 hours before running a knife around the cake in the pan and inverting it onto a cake stand.

Chocolate wrapped cake with white chocolate – cream cheese frosting

In addition to birthdays, people back home in Slovakia celebrate so called “name days”. Every day of the year, all the people with a certain name have a name day, and get to have a little celebration with a cake and presents, much like a birthday. Last week was the day to celebrate all the Slovak girls and ladies named Veronika, which also happens to be my sister’s name. I’d love to storm into her apartment with balloons, gifts, and flowers right now, but alas, that’s just not possible. So I’ve decided to do the next best thing, and bake a cake in her honor. I know it’s kind of silly, because of course she won’t get to have a bite of it. But it helps me to feel closer to her, and at least this way, all the butter and sugar won’t go straight to her hips and thighs, so I’m actually doing her a favor. At least, that’s what I keep telling myself.

I’ve been wanting to try my hand at chocolate piped wraps for a long time. I’m familiar with various chocolate decorations, but this project has always seemed like a little too much. Melted chocolate is much more fluid than royal icing, and I was worried I’d end up with a huge mess and chocolate smeared everywhere, so I kept putting it off. This weekend I finally bit the bullet. Yes, my hands were shaky, but it there is a first time for everything! I decided to bake a simple 6-inch chocolate cake and frost it with white icing, which provided a nice contrast to the dark chocolate lacy wrap. The project was fairly time-consuming (it took me nearly half an hour just to pipe the pattern on the parchment), and with all the baking, frosting, chilling and wrapping it ate away a substantial part of my Sunday. But it was so much fun, and I learned a lot (like, for example, that you shouldn’t forget to flip the parchment paper with your pattern before piping the chocolate, otherwise your pen marks will show up on the wrap :-)) It seems obvious, and I wanted to do it, but then forgot anyway. It is not such a big problem when working with dark chocolate, but it would be much more visible on a white chocolate wrap.)

All in all, a nice little project for a rainy and gloomy Sunday afternoon. I’m already dreaming of all the other things I could try with melted chocolate.

Happy belated name day, Veronika. I wish we could stuff our faces with the cake together ❤

img-2015-02-08-5873

Chocolate-wrapped cake with white chocolate-cream cheese frosting

Cake (for each layer of the 6-inch cake):
  • 8 tablespoons (1 stick) unsalted butter, softened
  • 12 tablespoons of granulated sugar
  • 1 large egg, room temperature
  • 8 tablespoons of milk
  • 12 tablespoons of all-purpose flour
  • 6 tablespoons of dark cocoa
  • 2 teaspoons of baking powder
White chocolate – cream cheese frosting:
  • 2 cups white chocolate chips
  • 2 packages (8 oz. each) full-fat cream cheese, softened
  • ½ cup (1 stick) unsalted butter, softened
  • 5 cups powdered sugar

+ 3 tablespoons of strong coffee or coffee/cocoa liqueur to moisten the cake layers (optional; I used Crème de Cocoa)
1 bar (4 oz.) semisweet baking chocolate for the wrap (more or less depending on a pattern you choose)

Method:
  1. Preheat the oven to 350 °F. Line a 6-inch cake pan with parchment paper and butter/flour the sides.
  2. In a bowl, whisk together all the dry ingredients for the cake. Set aside.
  3. Beat the butter and sugar until creamy. Beat in the egg and milk. Add dry ingredients and mix just until combined.
  4. Pour the batter into a lined pan, smooth out the top, and bake for about 35 minutes, until the cake springs back to the touch. Let cool in a pan for a couple of minutes, and then invert the cake on a cooling rack and let cool completely. (I baked each layer separately, but you could make a higher cake and then cut it into two layers, of course).
  5. While the cake is cooling, make the frosting: Microwave white chocolate morsels in a microwave-safe bowl at a medium power for 1 minute. Stir. Microwave again at 15 seconds intervals until melted. Let cool slightly.
  6. In a bowl of an electric mixer, beat the softened butter and cream cheese until fluffy. Add melted chocolate, combining well. Gradually add powdered sugar until desired spreading consistency. Set aside.
  7. Place one cooled cake layer on a turntable or a working surface. Sprinkle with coffee/liqueur if using. Mound a portion of the filling in the center, and using an icing spatula, spread it to the edge.
  8. Place the second layer onto the filling and push it gently into place. Brush the top layer with coffee/liqueur if using.
  9. Before frosting the cake, make a crumb coating (a thin layer of frosting that helps the crumbs to adhere to the cake, so they don’t mar the finish). Refrigerate for 30 minutes until firm.
  10. Frost the top and sides of the cake; the top should be flat and the sides straight on the finished cake. (The straighter the sides, the easier it will be to wrap the cake with chocolate at the end.) Put the frosted cake on a cake stand you plan to serve it on and place it in a fridge to chill.
  11. The chocolate wrap: Cut a strip of parchment paper you’ll be piping on. First calculate its length, which should be the diameter of your cake x 3.14, plus couple more inches for overlap. (My cake was 6 inches, multiplied by 3.14 = 18.84; the entire strip was under 22 inches long.) You also need to measure the height of  your cake, which will be the width of your paper strip (I added about ½ an inch here as well). In addition, you’ll need to extend the width by about an inch more – that way you’ll have a clear strip of paper at the top to hold the strip without risking that you will ruin the freshly piped pattern.
  12. You can make a free-hand pattern if you’re feeling brave, or you can draw a pattern on the parchment and trace it with chocolate (if you decide to draw a pattern, don’t forget to flip the paper before piping as I did :-)) Put your paper strip on a large baking sheet to make it easier to move it in and out of the refrigerator as needed.
  13. In either a microwave or a water bath, melt the chocolate, and fill a decorating bag no more than 2/3 full. After piping the pattern, place the paper strip on the sheet in the refrigerator to partially set (it only takes a couple of minutes, depending on the temperature in your fridge. Watch it, so it doesn’t harden too much, as it will be harder to wrap it around the cake. You need it to still be pliable.)
  14. Remove the cake from the refrigerator. Carefully lift the strip with the piped pattern off the baking sheet. Anchoring one end, slowly wrap the paper around your cake, gently pressing it into place. Chill well, and then carefully remove the parchment paper from the back of your chocolate wrap. (Keep the cake in the refrigerator until serving; because you weren’t using tempered chocolate for the wrap, it will soften faster at a room temp.)

Sunflower pizza bread

Bread baking is one of the oldest culinary arts. The process absolutely amazes me, each and every time. You start with only  flour, water, and some yeast, and with just time and warmth of the oven somehow end up with this round, golden,  crackly, wonderfully smelling goodness. There is something extremely therapeutic in bread making for me. Tiny cookies and frosted cakes, while awesome in their own right, would never be able to offer me as much as breads and rolls do. Just the act of putting my hands through the dough, “feeling” it, and working with it instantly calms me and brings me comfort. (There are many moments when the three men living with me are acutely aware the woman in their life needs some calming, and they all know what to do by now  – throw either chocolate or a bag of flour at her, and LEAVE. By the time they can smell the aroma of a freshly baked bread, it’s usually safe to approach the beast wife/mother).

Yeast dough is awesomely versatile. It’s stretchy and malleable,  you can really play with it, and give it hundreds of different forms. When my sons were little, I didn’t  bother buying them play dough. I let them have fun with scraps of my bread dough, and when they were done with their creations, I baked them up and voilà – play time and lunch rolled into one. (Baked dinosaurs, anyone?) Those were the good times, while they still wanted to play with their Mother. These days they just storm into the kitchen, wolf down a loaf or dozen rolls and walk away, only to be staaaarving half an hour later.

I had so much fun making this bread. This time I used savory “pizza” filling, but I bet sweet filling would be nice as well. The process is a little time consuming, but majority of it is just  “waiting time”, while you’re free to do whatever else you need or want (Need: to finally scrub down that bathroom. Want: to kick back with some magazines and ponder what I’ll bake tomorrow. Hmmm, which is it going to be? Tough, tough choice.) When the dough has risen, you shape it, fill it, put some egg wash on it, slide it into an oven, and there you have it – a perfect appetizer, light lunch, when paired with some green salad, or – in my case – a small snack to keep my men-sons from starving to death in the hour that it takes me to put dinner on the table.

img-2014-12-31-5793

Sunflower Pizza Bread

Yeast dough:
  • 450 g (1 lb., 3½ cups) all-purpose flour
  • 2 teaspoons salt
  • 250 ml (1 cup) milk, lukewarm
  • 2¼ teaspoons dry yeast
  • pinch of sugar
  • 2 egg yolks
  • 55 g (¼ cup) butter, softened
Filling:
  • 100 g salami
  • 100 g ham
  • 100 g cheese, grated (I used smoked Gouda)
  • ¼ cup each onion and red pepper, chopped 
  • 1 teaspoon each basil and oregano

+ 1 egg yolk mixed with a little water, for egg wash
sunflower seeds, caraway seeds, or poppy seeds for decoration

Method:
  1. Whisk sugar into a cup of lukewarm milk. add yeast, and let stand for about 10 minutes to dissolve and “bloom”.
  2. In a bowl of your stand mixer, mix all the remaining ingredients for the dough. Add the yeast/milk mixture, attach the dough hook, and knead on low speed for about 7 minutes, until the dough comes away from the sides of the bowl and is smooth and elastic (add a little flour/water by tablespoons if needed).
  3. Transfer the dough into an oiled bowl, cover, and let rise in a warm spot for about 45 minutes, until doubled.
  4. While the dough is rising, prepare the filling by mixing all the filling ingredients in a bowl. Set aside. Line a big baking pan with parchment paper.
  5. Punch down the risen dough and turn it out onto a lightly floured work surface. Divide the dough in half. Roll out each half into a circle about 9 inches in diameter (I used a plate that I traced onto the dough). Place one dough circle on the lined pan. Set the other circle aside and cover to prevent drying.
  6. Divide the filling roughly in half. Place one half of the filling in a heap in the middle of the rolled out circle in the pan. From the other half of the filling, form a ring around the edge of the dough circle, leaving 1 inch border.
  7. Place second circle of the dough carefully on the filling, pinch the edges to seal. Take a small bowl with the diameter of the heap of filling in the center, and place it on top of the dough where the heap is. Press down lightly, then take a fork and make indentations all around the bowl. Leave the bowl in place for now.
  8. Make crosswise slits about 1 inch apart all around the circle, cutting through the ring of filling. Turn each slit slightly to expose the filling. Remove the bowl from the center, cover the bread, and let it rise while you preheat the oven.
  9. Preheat the oven to 400 °F (convection oven 375 °F). Brush the bread with egg wash, and sprinkle with seeds. Bake for 20 – 25 minutes until golden.

Eggnog cake with blueberries and cream

I know, I know – eggnog is a wintery, Christmas treat, something that you sip after a day of skiing, curled up next to the fireplace with a book.  Even though there are still some forgotten holiday decorations scattered here and there at our house, I vaguely noticed the holidays are over. (I openly admit, I’m not a decorator. It seems like the minute I took the decorations down and carefully packed them away, it’s already time to bring them out again. In my dream life, I’d just keep one room in Christmas mode, another one would house all the porcelain bunnies, chicks, and silk daffodils, and the last one would be all scary, with bony skeletons, pumpkins, and dreadful, dusty cobwebs. Oh wait, we kind of already have that one.) Anyway, that way I’d be done with “decorating” and we’d just go from room to room as the seasons dictate. It’s important to keep your priorities straight – no decorating means more time for baking, right?!  But I digress. Back to the eggnog, shall we?

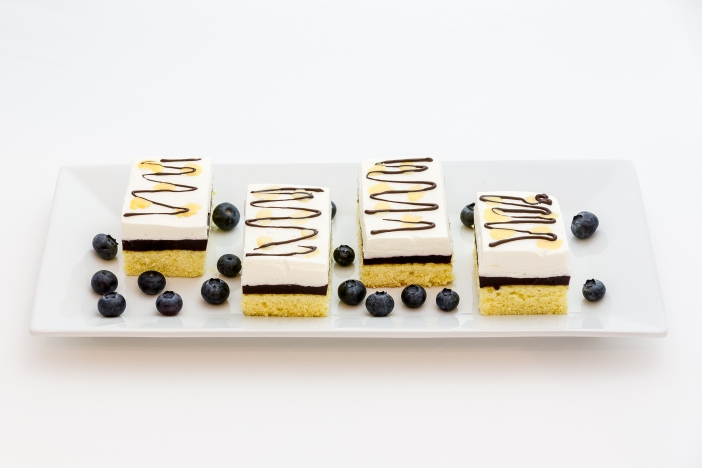
Ever since my friend taught me how to make homemade eggnog, there are holidays whenever we want at our house. (If you’ve never tried homemade eggnog, you absolutely should. Here is a good recipe). With the exception of pasta, we pour it in and on everything – cakes, bread and rice puddings, coffee, and straight down our throats, of course. This cake has it all – soft yellow cake base, enriched with eggnog, contrasting fruity layer made with fresh blueberries, and luscious sweet cream with tiny “lagoons” of eggnog on top. I chose blueberries today, just because I had them on hand, but I imagine raspberries or strawberries would work just as well.

img-2015-01-31-5853

Eggnog Cake with Blueberries and Cream

Cake:

  • 4 eggs, room temperature
  • 2 tablespoons hot water
  • 2 tablespoons eggnog
  • 160 g (5.5 oz.) caster sugar
  • 1 teaspoon each vanilla extract and lemon zest
  • 135 g (5 oz.) all-purpose flour
  • 70 g (2.5 oz.) cornstarch
  • 1/2 t salt 1 t baking powder

Blueberry jelly:

  • 200 g (7 oz.) blueberries, fresh or frozen
  • 200 g (7 oz.) sugar
  • 500 ml (2 cups) water
  • 80 g (3 oz.) cornstarch
  • 1 tablespoon vanilla extract
  • juice of 1 lemon

Cream layer:

  • 500 ml (2 cups) heavy cream
  • 1/4 cup powdered sugar
  • 1 teaspoon unflavored gelatin
  • 3 teaspoons cold water

+ 100 ml (3 oz.) eggnog
cornstarch for thickening
melted chocolate for decoration

Method:

  1. Preheat the oven to 350 °F. Line standard 9 x 13 cake pan with parchment paper, and grease the sides. (I used an oblong springform pan).
  2. In a bowl of your stand mixer beat the eggs with sugar, hot water, eggnog, vanilla, and lemon zest until thick and golden-yellow. In a separate bowl mix the dry ingredients, and lightly combine them with the egg mixture. Pour into the lined pan, smooth out, and bake for about 15 minutes, or until it springs back to the touch. Let cool slightly, then take out of the pan and remove the baking paper. Cool completely.
  3. For the fruit layer, combine all the ingredients in a blender, and cook on a medium heat for about 5 minutes (the “jelly” will clear and thicken). Still warm spread on a cooled cake and chill.
  4. Whipped cream layer: Combine gelatin and water and let stand for couple of minutes, until the gelatin absorbs the water and “blooms”. Then carefully heat the mixture in a water bath until hot to dissolve the gelatin (don’t cook). Let cool to room temperature. When the gelatin mixture is cool but still liquid, whisk the cream with sugar until soft peaks form, then, still whisking, slowly add the gelatin mixture, and beat until the cream reaches stiff peaks. Spread onto a cooled blueberry layer.
  5. With a small teaspoon, emboss tiny “lagoons” into a cream layer. Thicken eggnog with a little cornstarch, and fill the lagoons. Decorate with melted chocolate if desired.