Chocolate Cherry Braided Bread

Meditation it’s the new hip thing to do, the cool buzzword you hear everywhere you go these days. It’s supposed to reduce stress, relieve pain, improve sleep, and have host of other benefits, all of which sound really good. Carving out ten minutes of your time to just sit and breathe and do nothing seems easy enough, right? Well, yes and no. Actually, not at all. You see, I’m not someone whom I’d call a meditative type. More like “OMG, there is so much to do and so little time to do it all” overwhelmed panic type. So even though I could arguably use more of that blessed peace in my life, I’ve never been able to make the meditation a part of my day. The few times I’ve tried, it usually went somewhat like this:

Om.
Keep those eyes shut, ’cause you know you’ll otherwise see a lone sock under the couch or pillows that need to be straightened!
Om.
Am I in the moment? How do I know if I’m *really* in the moment?
Om.
My stomach is growling. It’s a good thing I’m home, otherwise everyone at the yoga class would hear it, and I hate when that happens! I didn’t have breakfast. Speaking of breakfast… what will I make for dinner? Shoot, I forgot to buy broccoli! Will have to stop by at the store when I go pick up offspring # 2.
Om.
My foot is itchy. Am I allowed to scratch it, or should I just notice the itchiness and not try to do anything about it? Will have to look that up when I’m done.
Om.
Breathe in, breathe out. Come on, it’s really not that hard! Om, darn it!!!

I was under a lot of stress trying to meditate properly and fruitfully, which I’m sure kind of defeats the whole purpose of meditation. I felt defeated; I was afraid I was never going to find peace and would be condemned to a life of no sleep, and chock full of anxiety and nervous tics.

But then, baking and specifically bread making came to my rescue. Thankfully I’m old enough to know there isn’t one and only right way to do things in life, and while some folks swear by yoga and are able to meditate an hour a day, I’m probably not one of them. But hand me a sack of flour, some yeast, and pinch of sugar, and I can stand at the kitchen counter for hours. Suddenly, I don’t see the dust bunnies and don’t feel that my back is killing me. The rhythmic humming of the mixer kneading is my om. In that moment, I don’t think about yesterday or tomorrow, and I’m able to give my full attention to the bread and keep my focus on the task on hand. When I’m checking on the dough that’s coming together and listening how it moves around in the bowl, I don’t need to wonder if I’m truly in the moment; I know I am: I’m patiently adding one spoonful of flour or water at a time, and then wait until the yeast wakes up and does its magic. Baking as meditation? It works for me!

And the by-products work for my perpetually starving men, too. Recipe for this bread is similar to my Braided Christmas Bread (Vianočka); the method stays the same, but I kicked it up a bit by adding chocolate and chopped cherries into the dough. I wasn’t sure how it’ll turn out at first; the jarred cherries were rather juicy, and even after soaking up the extra moisture with paper towel they were a bit hard to roll up in the dough. But the end result was well worth the effort – the bread was soft and buttery and there were bits of cherry and chocolate in every bite. Next time, I want to try to roll up some apricot jam into the dough before braiding it, or maybe finely chopped dried fruit with cinnamon… The possibilities are endless 🙂

img-2017-01-14-9471

Chocolate Cherry Braided Bread

Sponge:
  • 55 g lukewarm water
  • 7 g (2.5 oz.) active dry yeast
  • 50 g (1.75 g) strong bread flour
Bread dough:
  • 400 g (14 oz.) unbleached bread flour
  • pinch salt
  • 50 g (1.75 oz.) unsalted butter, softened
  • 33 g (1.25 oz.) light brown sugar
  • 2 eggs + 1 egg yolk, room temperature
  • 1 teaspoons fresh lemon zest
  • 1 teaspoon vanilla extract
  • all of the sponge
  • 110 g whole milk, lukewarm or room temperature
Filling:
  • 125 g (4.5 oz) dark chocolate, finely chopped
  • 3 tablespoons sugar
  • 3 tablespoons unsalted butter, softened
  • 270 g (9.5 oz) jarred cherries in syrup (drained weight)
  • 1 teaspoon cinnamon

+ 1 egg yolk, mixed with 1 tablespoon water – for egg wash
– poppy seeds and pearl sugar for sprinkling, if desired

img-2017-01-14-9478

Method:
  1. To make the sponge, combine water, yeast and flour in a bowl, and stir with a whisk until no dry flour remains. Cover and set aside in a warm spot for 20 minutes until the sponge has doubled in size.
  2. Place flour, salt, butter, sugar, eggs, egg yolk, lemon zest, and vanilla in the bowl of your stand mixer fitted with a hook. Add in all of the activated sponge, turn the machine on a low speed, and gradually pour in the milk. Knead the dough on a low-medium speed for about 8 minutes until the dough is fairly firm, smooth and elastic (If the dough seems to be too wet, add in a couple of tablespoons flour, one tablespoon at a time; if it is too dry, add in some more milk, one  tablespoon at a time). At the end mix in the rum-soaked raisins, making sure they are evenly distributed in the dough. Transfer the dough into a well-oiled bowl, cover, and let it rise in a warm spot until it doubles in volume, about 45 min. – 1 hour.
  3. Meanwhile, prepare the filling: Chop the chocolate and set it aside. Drain the cherries, chop them roughly and pat them dry with paper towel. Set aside.
  4. Making the bread: When the dough has doubled, transfer it onto a lightly floured surface. Divide it into 5 equal portions (if making a 5-strand braid), or 3 portions (if making a simple 3-strand braid). Form each portion into a ball, and let the balls rest under a dishtowel for 10 minutes. Line a big baking sheet with parchment paper.
  5. Roll each piece of dough into an 35 x 12 cm (14 x 5 inches) oblong. Spread the dough with 1 tablespoon of softened butter, and sprinkle it with 1/5 of the chocolate and 1/5 of prepared cherries. Sprinkle the filling with some cinnamon and roll it up tightly starting from the long side; pinch the edges to seal. Braid the ropes together, tuck the ends under, and transfer the bread onto the prepared baking sheet. Cover and let the bread rise second time until light and puffy, about 30 – 45 minutes. Preheat the oven to 350 °F ( 175 °C).
  6. Brush the bread with egg wash (I used two coats to achieve dark golden color), and sprinkle with seeds and pearl sugar if desired. Bake the bread for about 45 minutes until golden brown in color. (Check the bread halfway through baking and give it another coat of egg wash in places that have become exposed due to oven spring. If the loaf seems to be browning too quickly, cover the top with aluminum foil.)
  7. Let the bread cool on the sheet for 10 minutes and then transfer it to a cooling rack to cool completely before slicing. It’s also possible to slice it and freeze it; the slices reheat well in a toaster. This bread also makes a wonderful French toast or bread pudding.

Slovak Honey Cake with Caramel Buttercream and Roasted Nut Streusel Topping

Christmas is almost here! Tis the season to be overwhelmed – there is still so much to do and never enough time (and energy) to do it. I love Christmas – the traditions, the smells, the lights, and the family time… just getting there can be a bit too taxing. The calendar is filling up, and I feel like I’m terribly behind this year. Haven’t really started baking yet – I know from experience that if I get into Christmas baking too early, my men who eat like locusts will push right behind me and consume everything in sight, and I’ll have to break out the rolling pin three days before Christmas anyway. Same with cleaning – it’s just a never ending losing battle. No point in needlessly spending precious energy too soon 🙂

This cake is a forerunner of the serious Christmas cookie baking marathon that will take place at our house next week. There are desserts that simply cannot be absent from a holiday table in a Slovak household, and this is definitely one of them. However, its preparation is time consuming, and involves lots of fighting with a fragile honey dough: first with a rolling pin, when you need to roll out 4 – 6 thin layers of a soft sticky dough, and when that’s done, you need to convince said layers to agree to be transferred on and off baking sheets without tearing. All that rolling as well as need for careful handling can be daunting, and when you’d heaven forbid like to de-glutenize the cake on top of that, it holds true hundred times as much. But since this cake is a Christmas must-have for Mr. Photographer, last year I went on a mission to find a way to make it gluten-free for him, even if it should kill me. (In case you’re wondering, food is my love language, and I’m willing to go great lengths to make good food for people I care about. I’ve wished many times upon seeing the sad state of my bathrooms I could switch to cleaning love language for a while, but alas, I don’t see that happening any time soon).

Anyway, in my search I learned that many Slovak ladies must dislike the fighting the honey dough with a rolling pin just as much as I do, because some wonderfully clever soul apparently succeeded in modifying the recipe from a dough that needs to be rolled out to a honey sponge cake with seemingly no adverse effects to the appearance and taste. I made the cake in both gluten and gluten-free versions last year and it was a big success; I was quite happy with it and haven’t anticipated to ever need another recipe. Well, since before the beginning of November my inbox has been overflowing with must try Christmas recipes, and among them I bumped into yet another best recipe for the Slovak honey cake. This time, cake layers were rolled, but the author claimed the rolling to go swimmingly easy, and to top it off, there supposedly wasn’t any wait time till the cake layers soften under the filling, so the cake was to be consumable right away. Of course I was intrigued and had to try it! I found all the claims to be absolutely true, and last year’s favorite had to concede to a new winner. As far as I’m concerned, this honey cake recipe truly is the best: Gluten-full or gluten-free, the rolling was a breeze, and as promised, the cake layers didn’t get hard when cooled, and were soft as a pillow from the get go. I suspect the rum syrup I very generously soaked them with might have had something to do with it 🙂

So this version is another take on a traditional Slovak Christmas delicacy. And since men are inherently simple, I don’t think I’ll need to do much more for Mr. Photographer’s Christmas 🙂 If you like honey, and caramel, and nuts (and who doesn’t?!), and have time to spare in the upcoming pre-Christmas week, give it a try; it’s heaven in your mouth delicious!

img-2016-12-04-8759

Slovak Honey Cake with Caramel Buttercream and Roasted Nut Streusel Topping

Honey dough for 5 cake layers:
  • 45o g (1 lb.) all-purpose flour (for gluten-free cake, see Note)
  • pinch salt
  • 1 ½ teaspoons baking soda
  • 1 teaspoon dark cocoa powder
  • 180 g (6.3 oz.) powdered sugar
  • 180 g (6.3 oz.) unsalted butter, softened
  • 1 large egg
  • 6 tablespoons liquid honey
  • 4 tablespoons whipping cream
Caramel Buttercream:
  • 1 can sweetened condensed milk (397 g, 14 oz.)
  • 70 g (2.5 oz.) dry roasted ground walnuts/pecans
  • 250 g (8.5 oz.) unsalted butter, room temperature
Rum Syrup:
  • 2 ½ tablespoons granulated sugar
  • 1.5 dl (5 oz.) boiling water
  • 50 ml (1.7 oz.) dark rum
Roasted Nut Streusel:
  • 30 g (1 oz.) dry roasted ground walnuts/pecans
  • 50 g (1.7 oz.) honey cake crumbs (scraps of the remaining dough, re-rolled, baked, then finely ground)

img-2016-12-03-8755

Method:
  1. The day before, caramelize the sweetened condensed milk: Place an unopened can of sweetened condensed milk in a pot of water, so that the can is fully submerged. Cover the pot, bring the water to a boil, and simmer for 2 hours. Remove the can from water, let it cool, and refrigerate, still unopened, till the next day. Next day, let the can come to room temp and continue with the recipe.
  2. Make the honey cake layers: Place butter, sugar, egg, honey, and cream into a deeper saucepan. Place the saucepan into a bigger pot filled with water, creating a water bath. Over a medium heat, warm up the mixture, whisking constantly. Do not boil.
  3. Combine flour, cocoa, salt, and baking soda in a bowl of your stand mixer. Pour the warm honey butter mixture into the dry ingredients, and mix up a soft dough. Gather the dough into a ball and wrap it up in saran wrap. Set it aside to cool slightly.
  4. Get ready 2 or 3 bigger baking sheets and preheat the oven to 350 °F (180 °C). Cut 5 sheets of parchment paper. With a pencil, trace 22 cm (8.5 inches) circle on each of the sheets and turn the paper over, so that the dough won’t touch the pencil marks. Divide the dough into 5 equa portions, each about 190 g (6.7 oz.)
  5. Take one sheet of parchment, place one portion of dough into the center of the pre-traced circle and roll it out. You can flour the dough or your rolling pin if you need to, but I found it wasn’t necessary. Reserve the scraps of dough for later.
  6. Bake the cake in a preheated oven for about 4 – 6 minutes, till the edges turn light golden brown. The dough will still be very soft, it will firm up when cooled. Don’t overbake the layers, or they will be hard. Let the circle slightly cool on the baking sheet, and then remove it from the sheet, but let it rest on the parchment. Prepare all the remaining layers in the same way and let them cool. Re-roll the scraps into an oval/circle and bake it as well. Don’t try to handle the dough while it’s still hot/warm, or it will break. The dough is very easy to handle when cooled. (The cake layers can be made in advance and frozen with sheets of parchment between them. Defrost them completely before filling them with buttercream.)
  7. While the cake layers are cooling, prepare the rum syrup and caramel buttercream. For the syrup, dissolve sugar in hot water. Let the sugar syrup cool and then pour in the rum and combine. For the buttercream, whip the butter until light and fluffy. By spoonfuls, add in the caramelized condensed milk, whisking constantly. Add in the ground nuts and combine.
  8. Assembling the cake: Place the first cake layer onto a flat surface, covered with parchment. Smear the cake with approx. 20 ml (0.6 oz.) rum syrup, and coat it with 1/5 of the buttercream. Take second cake layer, brush it with 20 ml (0.6 oz.) rum syrup, and then use another 20 ml (0.6 oz.) syrup to soak the other side. Place the cake on top of the buttercream. Continue assembling the cake, using 2 x 20 ml (0.6 oz.) rum syrup for each layer, and covering it with 1/5 of the caramel buttercream. Frost the top and the sides of the cake and set it aside.
  9. For the streusel, process the baked scrap of honey dough into crumbs, and combine them with ground nuts. Scatter the streusel evenly all over the cake, covering top and the sides, pressing the streusel lightly into the buttercream. Let the cake stand in a cool place for about 2 hours to let the buttercream soak into the layers a little (I usually cover it with a big bowl and put it in the garage), and then refrigerate for 12 – 24 hours before cutting and serving. The remaining cake can be frozen.
Note:

For gluten-free cake, I used Bob’s Red Mill 1 to 1 gluten-free flour. It already contains gums, so no other adjustments were necessary. When I don’t have time to mix my own flour mix, it is my absolute favorite flour mix for baking.

Spiced Honey Plum Cake

The Fall has fallen upon us. I tried to put it off and keep the summer with me for just a bit longer by driving south to the ocean. It was sunny and sticky hot over there, and it felt great walking along the beach listening to the crashing waves and seagulls circling above the water. But even though the temperature still sometimes shoots up pretty high during the day, the mornings are already cold as if the sun wasn’t sure if it wants to roll out of the bed, and even if it decides to honor us with its presence, it goes down way too early. The leaves are turning and summer is slowly but surely passing away. Pretty soon, the sandy beaches, cold drinks, and flowing sundresses will be just a distant memory.

But breezy autumn bursting with colors is still a wonderful season on its own. Mellower than the summer, it is a time of harvest and time of abundance when it comes to fresh produce. I think I love the farmers markets in the fall even more so than during summer. The tables are overflowing with fresh and fragrant fruits and veggies, from squash and sweet potatoes to apples and pears. A true cook and baker’s paradise.

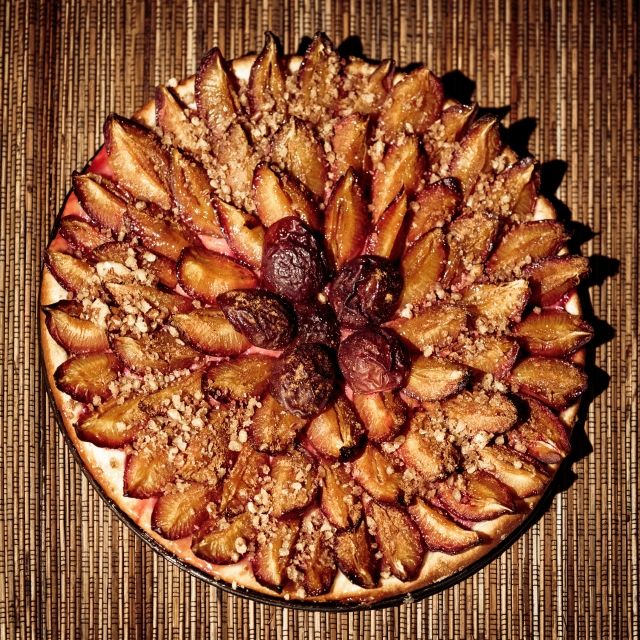
This week’s dessert features plums – sweet autumn delicacies that come in many types and colors. I adore plums with their juicy sweet flesh, contrasted by the tart skin. They’re awesome in every single way: eaten raw, cooked into jams, or baked into tarts and cakes. For baking it’s best to find a less juicy variety, such as Italian plum. When making a plum tart, it’s better to prebake the empty shell and give it a coat of egg white before filling it with fruit. I made a yeast cake, which is sturdier than a tart and thus better equipped to withstand the juiciness of plums, but I still sprinkled the dough spread in the pan with a mixture of cookie crumbs and ground almonds to ensure the cake wouldn’t get soggy. This simple plum cake is baked in every household back home when plums are in season, scented with cinnamon and sprinkled with streusel made from butter, flour, and powdered sugar. I took the basic recipe of my childhood and played with it a bit more: I coated the plums in a mixture of honey, lemon juice and brown sugar before arranging them on the cake, and used a touch of garam masala together with cinnamon to give the cake a wonderful aroma. I think it would be wonderful served with a dollop of brandy whipped cream, but I didn’t get to it – the boys wolfed it down just as it is. Give it a try if you get your hands on some Italian plums – it’s a perfect dessert to usher in Fall 🙂

img-2016-09-12-7534

Spiced Honey Plum Cake

Yeast Dough:
  • 200 g (7 oz.) all-purpose flour (or bread flour)
  • 50 g (1.78 oz., ¼ cup) granulated sugar
  • pinch salt
  • 1 teaspoon fresh lemon zest
  • 1 teaspoon vanilla
  • 50 g (1.78 oz.) unsalted butter, softened
  • 1 egg yolk
  • 150 ml (5 oz.) whole milk, mixed with 1 teaspoon sugar
  • 1.25 teaspoons active dry yeast
Filling:
  • ¼ cup each  ground almonds and cookie crumbs
  • 4 cups Italian plums, pitted and quartered
  • scant ¼ cup honey
  • 1 tablespoon lemon juice
  • 1 tablespoon brown sugar
  • 1 teaspoon cinnamon
  • ¼ teaspoon garam masala
Streusel  Topping (optional):
  • 15 g (2 tablespoons, 1/8 cup) all-purpose flour
  • 15 g (2 tablespoons, 1/8 cup) powdered sugar
  • 15 g (0.5 oz.) cold butter, cubed

img-2016-09-12-7542

Method:
  1. To make the yeast dough, combine lukewarm milk with 1 teaspoon sugar and yeast. Set aside for 10 minutes to activate the yeast.
  2. Place all the remaining ingredients for the dough into the bowl of your stand mixer fitted with a dough hook. When the yeast mixture looks nice and bubbly, add it to the bowl. Knead the dough on a low speed until it comes together and forms a ball. The dough should be soft, smooth, and elastic – if it’s too dry, add in some more milk, 1 tablespoon at a time, if it’s too wet, sprinkle in some flour, 1 tablespoon at a time. Knead the dough for at least 10 minutes. Transfer it into an oiled bowl, cover, and let it rise in a warm spot until it doubles in volume – 50 – 60 minutes.
  3. While the dough is rising, prepare the filling: Pit and quarter the plums. Whisk together honey, lemon juice, brown sugar, and the spices; pour over plums, set aside. Combine ground almonds with cookie crumbs in a small bowl; set aside. Butter and flour a 11 inch (27 cm) springform pan or tart pan.
  4. When the dough has risen, roll it out into a circle and fit it into the prepared pan. You can vary the thickness of the dough according to your preference – the thinner dough will produce a crisper cake. Discard the leftover dough. Sprinkle the dough with almond/cookie crumb mixture.
  5. Strain the extra juice from the plums and arrange them on the cake, pressing them slightly into the dough. Cover the cake and let it rise at a room temp again while you preheat the oven to 375 °F (190 °C).
  6. Make the streusel topping, if using: Combine flour, sugar, and butter, and mix them with your fingers into coarse crumbs. Sprinkle topping over the fruit.
  7. Bake the cake until the bottom is golden brown and the plums are soft, about 35 minutes. Let cool before serving. Serve with brandy whipped cream if desired.

Yeast Crescents with Walnut Filling

I just came back from a month long trip to Europe to see the family. I must say there wasn’t much baking going on while I was there – the kitchen in the apartment I was renting was so tiny I wouldn’t’ve even been able to place two baking sheets side by side on the counter – but the less time I spent in the kitchen, the more I enjoyed visiting with friends and family. I’ve missed them all more than the words can say, and I treasured every moment: The hugs, chats, and laughs we’ve shared together will now have to carry me over for a whole year, at least.

Living an expat life is not easy. Sure, it is exciting to be able to travel new places and get to know new people, and it’s exhilarating to rise to the challenge to build a completely new life from scratch somewhere else. It binds you to the person you’re in this adventure with – after all, at least in the beginning there won’t be anyone else you could depend on for a while. But this life also comes with an inevitable sense of loneliness: there are birthdays you are going to miss, weddings you won’t be able to attend. Not to mention Christmas holidays when you try your hardest to replicate the magical atmosphere you used to know from home, but despite the traditions you try to keep alive and cookies you bake with your kids exactly the same way your mom used to, somehow it still doesn’t work: the cookies taste different, the Christmas tree doesn’t smell quite so fragrant, and deep down, you know it’s not the same. It can’t be – it’s about the people, and they’re not there with you.

But you keep keeping on, and after a while you learn to adapt. Little by little you put down roots. You start making the new place your home and just when you think you might’ve finally gotten it down, something happens: a conversation in the grocery store or chit-chat with your hairdresser perhaps, which will remind you again that even after all these years you’re still very much a foreigner. You think differently, and no matter how much you try, in many ways you are still unlike the people around you. At that moment you can’t wait to go back “home”, even if for a short while. You get up, fly across the globe and eagerly step off that plane… and within hours you realize the strangest thing: The life you’ve been building somewhere else has changed you, and now even here, in a place you grew up in and used to know so well, you’re different. There are things you don’t understand anymore, some that annoy you, or downright drive you crazy. You might be home, but you’ve become a stranger in your own land.

You’re now officially an expat: a person whose home is neither here nor there, or who has home in both places at the same time. I still haven’t quite figured out how to have two homes. It feels weird to fly out to go “home” and then to be returning “home” when the trip is over. But that’s exactly how it is and I don’t expect it to change anytime soon. Home is where people you love are, and as long they will be here and over there, thousands miles apart, so will be my two homes.

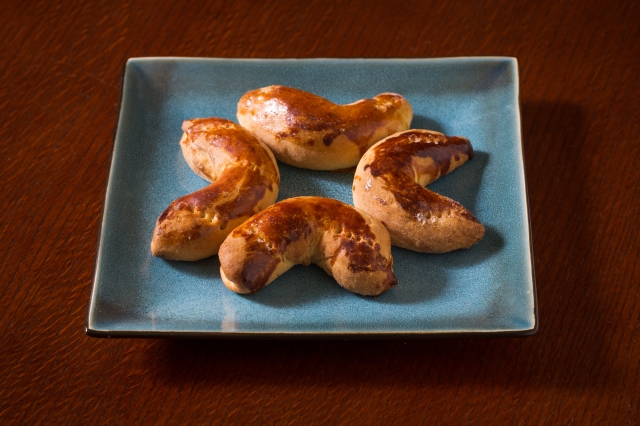
I have to say I’ve missed my big kitchen while away. I’ve never appreciated it more than when I was bumping into Mr. Photographer when we randomly met in the teeny rental kitchen getting a glass of water in the middle of the night. As usual, I brought new cookbooks and tons of cooking magazines from the trip, and couldn’t wait to put them to good use. These little yeast croissants are a special dessert from the region I grew up in. The yeast dough they’re made from is very rich – traditionally, the weight of the butter should be about 30 % of the amount of flour used. The high amount of butter and no egg whites in the dough also make the pastries very soft. The croissants can be filled either with walnut or poppy seed filling. After they’re formed, they are given a coat of egg wash and quite unusually they’re left to rise not in a warm place, but in a draughty spot to make the egg dry up. When that happens, they’re brushed with egg yolk again – the double egg wash will give them their typical cracked glaze appearance. They should’ve had more of a horse-shoe shape; they were just right going into the oven, but still puffed up a little too much while baking. Oh well – they still disappeared in no time, and making them helped me to deal with the very fresh acute homesickness I’m feeling at the moment… so I guess they’ve accomplished what they were supposed to 🙂

(Note to self: When you’re scheduling to publish a post, it would be helpful not to forget to insert the pics! I’ll blame it on the jetlag… sorry about that.)

img-2016-08-10-5108

Yeast Croissants with Walnut Filling

(recipe makes about 30 pastries)

Dough:
  • 390 g (about 13.5 oz.) all-purpose flour
  • ½ teaspoon baking powder
  • 1/3 cup powdered sugar
  • 2 egg yolks
  • 1/2 cup + 3 tablespoons unsalted butter, room temperature
  • 1 teaspoon vanilla extract
  • 1/4 cup sour cream
  • 1 scant teaspoon dry yeast
  • pinch sugar
  • 1/3 – 1/2 cup lukewarm milk, divided
Walnut Filling:
  • 2 cups walnuts, ground
  • ½ cup powdered sugar
  • 1 teaspoon fresh lemon zest
  • 1/8 cup hot milk
  • handful of raisins (optional; not in the traditional recipe, but I always add raisins to nut- and poppy seed filling to keep it moist)

+ 3 egg yolks, beaten – for egg wash; 1 egg white – for brushing the edges of the dough

img-2016-08-10-5106

Method:
  1. To make the yeast dough, first combine 1/3 cup of lukewarm milk, pinch sugar, and yeast in a small bowl. Let stand for couple of minutes to activate the yeast.
  2. In the meantime, place all the remaining ingredients for the dough except milk into a bowl of your stand mixer fitted with a dough hook. When the yeast mixture looks nice and bubbly, pour it in, and with the mixer on a low speed, begin kneading the dough. Knead for about 10 minutes, carefully adding the rest of milk if necessary to make a smooth and soft dough. Let the dough rise, covered in a warm spot, for 30 – 40 minutes.
  3. While the dough is rising, prepare the filling by combining all the ingredients listed. The filling should be somewhat sticky and hold together enough so that you can make a small cylindrical “snake” out of it. If it’s too dry, add a splash more milk, if it’s too wet, add in some plain breadcrumbs/cookie crumbs. Cover the filling and set it aside.
  4. Turn the risen dough onto a floured surface and divide it into small balls (each portion should weigh about 25 g/0.8 oz.) Cover the dough balls with a dish towel and always take just the one you’re working with to keep them from drying out. Line two baking sheets with parchment paper.
  5. To form the crescents, take a ball of dough and roll it gently into an oval. Roll about 10 g/0.3 oz. of filling into a small cylinder and place it in the middle. Brush the edges of the dough with a little egg white and enclose the filling into the dough. With a palm of your hand, gently roll the filled dough into a thin cylinder about 10 cm/ 4 inches long and place it seam side down on the baking sheet, giving it a horse-shoe shape. Continue making the pastries, giving them enough space on the sheet to rise.
  6. Brush the croissants with egg yolk and let them rest, uncovered, in a cold drafty place until the glaze dries up (I chilled mine for about 20 minutes in the fridge).
  7. When the egg wash dries up, take the pastries out of the refrigerator and give them a second layer of egg wash. Let them rise for about 20 minutes on the counter while you preheat the oven to 375 °F (190 °C).
  8. When the oven is ready, prick each croissant twice with a fork to prevent it from bursting open while baking, place the baking sheets in the oven, and bake the pastries for about 12 – 14 minutes until they’re darker golden brown.


Sweet Easter Bread (Mazanec)

Spring is in the air now, I suppose; the flowers are in bloom, the sun is shining (occasionally – this is still the Pacific Northwest, after all), and everyone becomes marginally more cheerful as the dreariness of winter wears away. The weather is actually cooperating this Easter – the kids won’t have to put on rain boots and wade through the downpour looking for eggs, which already feels like a major Easter miracle to me! I don’t know if it’s because I don’t have small kids anymore, so the egg hunts and such are not on the agenda, but I can’t seem to get into the Easter mood this year. I think it was easier in a way while they were little munchkins, and Easter used to unfold in a very predictable fashion: Dress them in their very best outfits. Somehow, get to church on time and try to wrangle them through the service when all they think about is candy that will follow. Take them to an egg hunt; settle inevitable brotherly quarrels about who saw which chocolate egg first and help them to fairly divide the loot. Suffer in silence as you see their brand new white dress shirt (or your couch!) getting chocolate smears all over, and then try to keep them from climbing the walls and tearing the house down, when they get all crazy from the candy overdose. True Easter bliss 🙂 It wasn’t easy and I remember the relief I felt when it was all over and I was secretly munching on one of their Cadbury Eggs in the evening, but now I have to confess I kind of miss it.

I tried to make myself feel more Easter-y by making the house look somewhat more presentable and coloring some eggs, but that was kind of a debacle in itself – I wanted to ditch the chemical colorings and go with Mother Nature this year, but no matter if I colored with spinach juice, beet juice, cabbage juice or turmeric, the eggs all emerged the same murky hue, as if I bathed them in the muddy pond behind our house. (The only natural coloring that never disappoints are onion peels!) Next year, I’m back to acid green and Barbie pink from a box, I think.

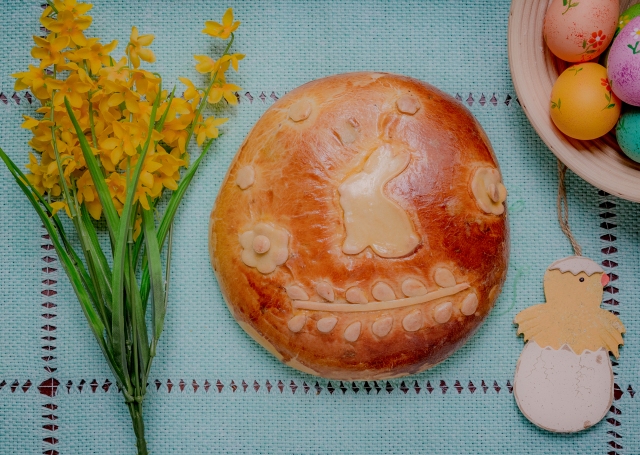
At least the baking part was a success 😉 This sweet Easter bread is a classic Easter dessert baked back home on Easter Saturday. It is a buttery yeast bread, enriched with eggs and raisins. Traditionally it is slashed in the form of cross on top in remembrance of Jesus’ death on the cross, and sprinkled with sliced almonds. I wanted to play with it a bit more, so I added decorations made from simple dough made by mixing flour with some egg white and water. I also soaked the raisins in rum to plump them up, and added a spoonful of honey to the dough for better browning. With some butter and a touch of jam it’ll be a splendid breakfast tomorrow.

Happy Easter, everybody! Bake your heart out, soak up the sun if you’re lucky enough to have it, and eat all the chocolate you can!

img-2016-03-26-2564

Sweet Easter bread (Mazanec)

 Dough:
  • 450 g (1 lb.) bread flour (or all-purpose flour)
  • pinch salt
  • ½ cup (100 g, 3.5 oz.) white sugar; + 1 teaspoon to sweeten the milk
  • 2 egg yolks
  • 100 g (scant 1/2 cup) unsalted butter, softened
  • 1 tablespoon honey
  • 2 teaspoon vanilla
  • 1 teaspoon fresh lemon zest
  • 1 cup (250 ml, 8 oz.) lukewarm milk
  • 2 ¼ teaspoons dry yeast
  • ½ cup raisins, soaked in 1/2 cup rum + 1/2 cup water, and drained
  • sliced almonds (optional)
 Decorative white dough:
  • 100 g (3.5 oz.) plain all-purpose flour
  • 1 egg white
  • milk as needed to make a pliable dough

+ 1 egg yolk mixed with 1 tablespoon water – for egg wash

img-2013-03-30-3360.jpg
Method:
  1. To make the dough, combine milk, dry yeast, and 1 teaspoon of sugar. Set aside for 10 – 15 minutes to activate the yeast.
  2. Place the rest of the ingredients except raisins in the bowl of your stand mixer fitted with a hook. When the yeast is nice and foamy, add it to the bowl. Start kneading the dough, adding a bit of milk or flour if the dough seems to be too dry or too wet. You should aim for smooth and elastic dough, that’s somewhat firm, but not stiff. Add in the raisins and mix them in well.
  3. Transfer the dough into an oiled bowl, cover, and let it rise in a warm spot until doubled, about 45 min. – 1 hour. Line a big baking sheet with parchment paper and set it aside for now.
  4. Make the decorations, if desired: In the food processor with an S-blade, mix the flour and the egg white. Add in as much milk until the dough forms a firm ball.
  5. On a floured surface, roll the decorative dough to about 1 – 2 mm thickness. With Easter cutters, cut out decorations as desired. Cover them and set aside.
  6. When the dough has risen, punch it down and form a nice round ball. Transfer the ball onto the lined baking sheet, cover, and let it rise the second time for about 20 – 30 minutes. Preheat the oven to 350 °F (175 °C).
  7. When ready to bake, coat the entire bread generously with egg wash. Gently place the decorations where you want them; but don’t press down too much. The egg wash should help to keep the decorations in place. You can coat the decorations with egg wash, or leave them dry for better contrast. If you’re not using the decorations, slash the dough in the form of cross and sprinkle sliced almonds on top.
  8. Bake the bread for about 35 – 40 minutes, until nicely risen and golden brown. Let cool completely before slicing. Serve with butter, jam, and honey.
Note:

I doubled the recipe and also made sweet yeast nests with colored eggs inside. To make those, form the dough into ropes about 1-inch (2.5 cm) thick and 14 inches (about 30 cm) long, and then braid two ropes together and join the ends to make a round “nest”. Let the nests rise a second time, and place a colored egg in the middle of each one, pressing down lightly. Brush the  nests with some egg and sprinkle with coarse sugar, and bake at 350 °F (175 °C) for about 20 – 25 min. (You don’t have to boil the eggs beforehand; they cook while the nests are baking in the oven.)

Slovak Cod Fish Salad with Homemade Crescent Rolls

There are three things I can’t imagine my domestic goddess career without: Vitamix blender, a big enough food processor, and a strong stand mixer. In my book, they’re like the holy trinity of kitchen gadgets and I have an undying love for each one of them. Having said that, last Monday was a sad, sad day: My beloved KitchenAid, a trusty companion and mighty helper quite unexpectedly bit the dust. I put it on my Christmas list some ten years ago and it proved to be a true workhorse: it never let me down, managed to keep up with my crazy pace of one loaf plus some muffins (or rolls, or pasta) a day and did everything I asked for without a single glitch.

But then the fateful Monday came: out of the blue it breathed its last and left me to my destiny – with sticky hands, counters covered in flour and a sourdough starter bubbling away by the fireplace, ready to make some bread. Mr. Photographer took one glance at my sad puppy face and bless his heart, didn’t hesitate one second. He knows too well that a PMS-stricken woman that can’t calm her all-over-the-place emotions by much needed baking is nothing but bad news and presents a potential threat for the entire family, so he told me to promptly go order a new one and pay for express shipping. What can I say – I married a wise man 🙂

Thirty six hours later (not that I was counting!) my late KitchenAid’s red-colored cousin arrived to my doorstep and I’ve been a happy camper ever since. And this weekend the cheerful newcomer helped me to bring forth some homemade happiness: Slovak crescent rolls to accompany a traditional cod fish salad. Cod fish salad, with finely chopped onions, crunchy carrots, and loads of mayo, most often wolfed down with crispy crescents is a Slovak man’s food, and any guy back home could easily live on it for months on end, especially if he has some cold beer to wash it down with. The homemade version is million times better than the salad sold at delis and grocery stores, of course, and the crescents – crispy from the outside and soft and chewy on the inside – are a must; they round up the whole meal very nicely. The salad needs to be made a day before, so the flavors have time to marry… and the crescents are best fresh, straight from the oven 🙂 Please give this simple meal a try when you’ll be feeling adventurous and will want to branch out a little from the usual tuna salad sandwich!

img-2016-02-20-0052


Slovak Cod Fish Salad with Homemade Crescent Rolls

(crescent recipe adapted from http://www.bonvivani.sk; recipe makes about 1 kg (2 lbs.) cod salad and 8 big crescent rolls)

Cod Salad:
  • 1 kg (2 lbs.) fresh cod fillet
  • 3 l (qt.) water
  • 250 ml (8 oz., 1 cup) + 5 tablespoons white vinegar
  • 1 tablespoon black peppercorns
  • 3 bay leaves
  • 2 big carrots
  • 1 red onion, finely chopped
  • approximately 250 g (1/2 lb) good quality mayonnaise, homemade or store-bought
  • 3 tablespoons mustard
  • salt & pepper to taste
Crispy Crescents:
  • 450 g (1 lb.) all-purpose flour
  • 1 tablespoon olive oil
  • 1 tablespoon salt
  • 1 teaspoon honey
  • 250 ml (8 oz., 1 cup) milk, lukewarm
  • 1 teaspoon granulated sugar
  • 2 1/2 teaspoons active dry yeast
  • 2 egg yolks mixed with 1 tablespoon water, for egg wash
  • coarse salt & caraway seeds, for sprinkling
img-2016-02-18-1467


Method:
  1. For the cod salad: Place 3 l (qt.) water with 1 cup vinegar into a deeper saucepan; add the bay leaves and peppercorns. Bring to a boil and cook for about 5 minutes. After 5 minutes add in the cod fillets and continue to simmer for 10 additional minutes.
  2. While the fish is cooking, peel the carrots. Set aside.
  3. With a slotted spoon, take out the cooked fish from the water; set aside to cool. Place two whole carrots into the same vinegar water, and cook for 3 – 5 minutes, until still crunchy.
  4. Grate/finely chop the carrots into a big bowl. With a fork, tear the cooled fish meat into small pieces and add it to the carrots together with finely chopped onion.
  5. The quantities of the remaining ingredients are approximate; add as much mayo as to make a moist salad, and salt/pepper/vinegar to taste. Cover and let the salad rest in the refrigerator overnight before serving.
  6. For the crescents, combine yeast with lukewarm milk and 1 teaspoon sugar; set aside for 10 minutes to let the yeast “bloom”.  Place flour, oil, honey, and salt into a bowl of your stand mixer fitted with a hook.
  7. When the yeast mixture looks nice and bubbly, pour it to the ingredients in the bowl. Mix/knead the dough until smooth, soft, and elastic, about 10 minutes. If the dough looks too dry, add in couple tablespoons milk/water – 1 tablespoon at a time; if it’s too wet, sprinkle in some additional flour. (Mine was a little dry and I added in about a tablespoon of sour cream that needed to be used up).
  8. Transfer the dough into a well oiled bowl, cover, and let it rise in a warm spot until doubled, about 50 – 60 minutes. Line two baking pans with parchment paper.
  9. When the dough has risen, punch it down and transfer it to a big wooden block (I didn’t even have to flour the board, the dough was very easy to work with.) Divide the dough into smaller balls, depending on how many/how big crescents you’d like to make – I  weighed it and divided it into 130 g (4.5 oz.) portions.
  10. Working with one portion at a time and keeping the rest of the dough balls covered, roll out each ball into an oval. Don’t roll out all the way, and keep one end of the oval thicker. Starting from the thicker end, start rolling the oval into a crescent, pulling the opposite end away to elongate the oval as much as possible without tearing it. Roll the crescents fairly thin (about 3 cm, a little over 1 inch and 15 cm, 6 inches long) – they will rise substantially during their second rise and while in the oven; making them longer and thinner is better. Place the crescent onto the parchment lined pan and continue making the crescents the same way.
  11. Cover the crescents with a clean dishtowel and let them rise the second time for about 15 minutes while preheating the oven to 400 °F (200 °C). Brush the crescents with egg wash and sprinkle them with coarse salt and seeds. Bake for about 15 – 17 minutes until golden brown. Transfer the crescents to a cooling rack to cool (and try not to eat them all while they’re still hot and crackly 🙂


Punch Cake (Punčové rezy)

I’m sure you’ve noticed Valentine’s Day is upon us. It seems we just took down the lights, packed away the tree, the stockings and whatnot, and it’s already time to think pink and red! Santa with his reindeer crew departed back to the North Pole and all of a sudden love is in the air and there will be a two week buildup of expectations in anticipation of the most romantic day of the year. We ladies dream of nice dinner by the candlelight, jewelry, flowers, and chocolate. The guys? I’m sure most of them haven’t even registered yet that the world became shrouded in pink haze, much less to infer what it means and what their women might be thinking about. And then on the 14th they’ll be like, “Drat! Is it Valentine’s Day already?!”, and on their way home from work they’ll be hastily stopping at the grocery store and buying limp bouquets and broken chocolates.

Those darn expectations versus the reality 🙂

I’ve said it before and I’ll say it again: I don’t care for Valentine’s Day much. To me it’s just too sweet, too artificial, too fake of a holiday. I refuse to get dragged into the hype, or measure the quality of a relationship by the actions of one day. Sure, Valentine’s Day is nice in theory; I mean, who wouldn’t want to feel special, loved, and appreciated? But way too often our mutual expectations clash and what was supposed to be a special evening only ends up with disappointment. Couldn’t he put in a little bit of effort for once? Couldn’t she just appreciate all that I do for her? Sounds familiar? The Hallmark industry would want us to believe Valentine’s Day is a huge deal – a once a year opportunity to show our partners how much they truly mean to us. But it’s just a huge pink bubble, really. In fact it’s just one single day in February. One day out of the whole year. And to be honest, I’d much rather feel my man’s love in gazillion small things throughout the year than see him trying to “prove” his love by something big on Valentine’s day. I don’t care for too many roses, too many kisses, and too many hearts.

I just want one. And I want it every day.

So even though people might call it Valentine’s Day, to me it’ll be just another Sunday. And in our home, Sundays are made for baking. I already know how I’m going to spend this years’ Valentine’s. With my guy, in the kitchen, doing what we both love: combining food and photography. And because there are many ways to show love to someone, in these three weeks leading up to Valentine’s Day all my baking will be gluten-free.

The first one of the Valentine-themed creations is punch cake, made per Mr. Photographer’s request. Punch cake is another cake we grew up with, readily sold in Slovak coffee shops. Even though it is Hungarian in origin, you’ll find it not only in Budapest, but also in Vienna, Prague, and Bratislava. It’s basically a layered vanilla cake with a punch soaked color contrasting middle layer. Punch – fruity liquid made of rum, lemon, orange, fruit syrup, water, and tea – is what gives the cake its name, and it’s also what makes it very moist. The process is a little time-consuming, mostly because you need to let the cake sit overnight to soak up all the punch goodness. You can make the punch as little or as much boozy as you like – just sub part of the water with alcohol if you wish. Thanks to the orange/lemon juice and zest the cake has a pronounced citrusy flavor, and the pink hue added to the glaze makes it very love-fest appropriate!

img-2016-01-31-100-1446

Punch Cake (Punčové rezy)

Each of the two yellow cake layers:
  • 3 eggs, room temperature, separated
  • 135 g (5 oz.) granulated sugar
  • 1 teaspoon vanilla extract
  • 2 tablespoons mild tasting oil (I used grapeseed oil)
  • 2 tablespoons hot water
  • 180 g (6 oz.) all-purpose flour/ 150 g (5 oz.) gluten-free flour mix; see Note
  • 1 teaspoon baking powder
  • 1/4 teaspoon cream of tartar
 Middle punch layer:
  • 4 eggs, room temperature, separated
  • 150 g (5 oz.) granulated sugar
  • 1 teaspoon vanilla extract
  • 2 tablespoons mild tasting oil
  • 4 tablespoons hot water
  • 220 g (7.5 oz.) all-purpose flour/ 200 g (7 oz.) gluten-free flour mix
  • 1 1/2 teaspoons baking powder
  • 1/4 teaspoon cream of tartar
  • couple drops of red food coloring, see Note
Punch soaking syrup:
  • 100 ml (3.3 fl. oz.) water
  • 240 g (8.5 oz.) granulated sugar
  • 1 bag of strong black tea
  • 50 ml (1.5 fl. oz.) seedless raspberry jam (or thick syrup)
  • 2 organic lemons, zest and juice
  • 2 organic oranges, zest and juice
  • 100 ml (3.3 oz.) dark rum
 Glaze:
  • 250 g (8 oz.) powdered sugar
  • 2 tablespoons hot water
  • 1 tablespoon lemon juice
  • 1 tablespoon raspberry juice/syrup

+ 400 g (14 oz.) thick apricot jam; additional rum for soaking the vanilla cake layers

img-2016-01-31-100-1450

Method:
  1. To make the vanilla cake layer: Line the bottom of a 33 x 23 cm (13 x 9 inch) baking pan with parchment paper; butter and flour the sides. Preheat the oven to 350 F (176 C).
  2. Whisk the egg yolks with the granulated sugar until thick and light yellow in color, about 10 minutes. Gradually add in the oil and the hot water.
  3. Sift flour and baking powder together; set aside.
  4. Whisk the egg whites with salt and cream of tartar until firm peaks form.
  5. Carefully fold the flour and the egg whites into the egg yolk mixture. Pour the batter into the parchment lined pan and bake the cake for about 10 – 15 minutes, until the top springs back to the touch and the toothpick inserted into the center comes out clean.
  6. Invert the cake out of the pan; do not remove the parchment paper for now. Let the cake cool.
  7. Prepare the second vanilla cake layer the same way; again, do not remove the parchment paper after you take the cake out of the oven.
  8. To make the red middle layer: Line the bottom of a 33 x 23 cm (13 x 9 inch) baking pan with parchment paper; butter and flour the sides. Preheat the oven to 350 F (176 C).
  9. Make the cake the same way as the yellow vanilla cake, adding the red food coloring together with oil/water to the egg yolks. Bake the cake for about 10 – 15 minutes until done, invert it out of the pan and let it cool with the parchment paper on.
  10. While the cakes are cooling, prepare the soaking syrup: Make a strong tea using one tea bag per 100 ml (3.3 fl. oz.) water.
  11. Combine the tea with rest of the ingredients except rum, and cook, stirring, until the sugar dissolves and the syrup thickens a little, about 2 minutes. Add in the rum and mix thoroughly. Set aside.
  12. Assembling the cake: Place the red cake layer, still on its parchment paper back into the washed baking pan. Carefully but very generously soak the cake with the punch syrup. Go slowly; you don’t want to overdo it with the syrup all at once. Let the syrup soak in for about 30 minutes before proceeding with the recipe.
  13. Spread one of the vanilla cake layers (still on parchment) with half of the apricot jam and place it, jam side down, on the red cake layer in the pan. Carefully invert the cakes out of the pan on a big cutting board, and remove the parchment paper that is on top of the red punch-soaked layer.
  14. Spread the second vanilla cake with the rest of the jam and place it, jam side down, on the red cake layer. Place a baking pan on top of the cake, and chill the cake in the refrigerator for two hours. After two hours, weigh the cake down with some heavier books/bags of flour, and let the cake sit in the refrigerator overnight.
  15. The next day, make the glaze: Combine the boiling water, lemon juice, and raspberry syrup; add in the powdered sugar and make a smooth and spreadable glaze. (You can vary the proportions of the liquids if you prefer a darker/lighter color.)
  16. Finishing the cake: Take the cake out of the refrigerator, flip it again so the bottom layer Is now on the top, remove the parchment paper, and pour the glaze over the cake. Give the glaze time to set, cut the cake into portions, and serve.
 Note:

Since I was making the cake gluten free, the process was somewhat more complicated, and I (once again) encountered more than a few surprises along the way. I used Cup-4-Cup gluten-free baking mix, which is a high quality brand. As you can see, I had to reduce the quantities for the gluten-free cake; the cup-for-cup method just wasn’t working. The batter was still very thick, and it was hard to spread it onto the baking sheet; it kind of just sat there as a huge blob, refusing to move. I had to resort to my reliable method of spreading gluten-free batters, and spread/ push the dough around with a wet spatula (eventually even with my fingers, which I kept dipping into water). Since the dough was so thick, I wasn’t able to spread it as evenly as I would have liked. (I didn’t have this problem with gluten cake.) I also had to bake the gluten-free cakes about 5 min. longer than their gluten-full counterparts.

For the food coloring I used the red from India Tree Nature’s Colors Decorating Set, which is beet based. (I avoid chemical food colorings.) It didn’t give me the color I was after, unfortunately, and I ended up supplementing the color with freshly squeezed raspberry juice. For glaze I didn’t bother with coloring and just used raspberry juice.

Meringue Sandwich Cookies with Caramel Coffee Buttercream Filling (Laskonky)

It’s that time of year again. We flipped our calendars, wrapped up the year 2015 and lifted our glasses in a toast to happy new year. Folks have been reminiscing and talking about their resolutions. I have to say I’m not usually one to set new-year’s resolutions – to me they’re just empty lofty proclamations that don’t have a big chance to stick for long. That doesn’t mean I don’t reflect on things that happened and think about changes I’d like to make, though.

We made a trip to the ocean on a New Year’s day. I’m a Pisces and love the sea, and as I was strolling along the beach listening to waves crashing against the shore I was thinking about the year that passed – pondering the things I wish I’d done, those I wish I’d not done, and what I’d like to take from it for the future. Over the past year, I have all too often found myself pushing myself – to do more, to work harder, to try make everything just right until I could no longer continue. We women and mothers especially are quick learners when it comes to taking care of others, and can get very good in anticipating and fulfilling their needs. Seemingly we also take very good care of ourselves – at least on the outside: I start off every day with a green smoothie and drink sixty-four ounces of water. I eat healthy and use sunscreen religiously. I schedule yearly check-ups and keep up with the doctor’s recommendations. But way too often I forget the other, far more important part – how to take care of myself on the inside. I push myself to the side, play resilient, slap band-aids on feelings I’d rather not know about or tell myself I can deal with them later. I convince myself and everybody else I’m fine when in fact nothing could be farther from the truth.

And so my resolution and “to-do list” for the 2016 consists of only one item, really: Learn to take better care of myself. I want to be gentler with myself and listen to my body and soul more, instead of paying too much attention to the world and people around. I vow to become a better friend to myself – after all, we just wished each other a happy new year, and it’s rather hard to be happy when someone is mean to you, even if/especially if that someone is you! I plan to make a conscious effort to do me – to do whatever brings me joy as opposed to what I for whatever reason feel compelled to do. Be more present, and live a fuller and more authentic life.

As for me, spending time in the kitchen playing with tastes, textures, and aromas is definitely a step in right direction! So without further ado I present to you my first baking effort of the year. I had way too many egg whites left after the Christmas baking that needed to be used up, and these meringue sandwich cookies fit the bill perfectly. They are commonly sold in Slovak bakeries, just as the popular French macarons are made with only egg whites, ground nuts, and sugar, and can be filled with different buttercream based fillings. The typical oval shape is achieved thanks to a special plastic form with openings through which you press the batter onto the baking sheet, but if you can live with less uniform and less perfect cookies, you can just take an icing bag/tablespoon and make small mounds of batter on the parchment paper and flatten them slightly. I went a little overboard in my quantity estimations – the batch made with six egg whites gave me 50 individual cookies, which I filled with buttercream and ended up with final count of 25. It was way too many, so next time I’ll probably halve the recipe. Good news is that you can store the unfilled meringue cookies in an airtight container in a cool and dry place for couple of days and fill them later as needed. The buttercream is caramel based with hints of coffee, but you can use any buttercream that suits your fancy!

Whether you bake, make pottery, sing, or jog, may we be able to make this year truly happy for ourselves. Here’s to 2016!

img-2015-12-15-1232

Meringue Sandwich Cookies with Caramel Coffee Buttercream Filling (Laskonky)

 Cookies:
  • 6 egg whites, room temperature
  • pinch salt
  • ¼ teaspoon cream of tartar
  • 330 g (11.5 oz.) white sugar
  • 160 g (5.5 oz.) finely ground walnuts (pecans)
  • 100 g (3.5 oz.) powdered sugar
  • 1 tablespoon all-purpose flour (if you want to make the cookies gluten-free, use gluten-free flour mix in the same quantity)
  • pinch baking powder
Caramel Coffee Buttercream Filling:
  • 6 tablespoons white sugar
  • 2 tablespoons water
  • 250 ml (8 oz., 1 cup) half-and-half or whole milk; divided
  • 1 teaspoon vanilla
  • 1 tablespoon instant coffee
  • 2 egg yolks
  • 10 g (0.4 oz.) cornstarch
  • 230 g (8 oz., 2 sticks) unsalted butter, room temperature

img-2015-12-15-1227

Method:
  1. To make the cookies: Line two big baking sheets with parchment paper and preheat the oven to 265 °F (130 °C).
  2. Put egg whites with the salt and cream of tartar in a bowl, and then place the bowl over a pot with small amount of boiling water. Whisk the egg whites over the water bath gradually adding granulated white sugar until very firm peaks form, about 15 minutes. (I transferred the egg white mixture after 15 minutes into a bowl of my stand mixer and whisked it on a high speed for a couple more minutes to achieve a very stiff consistency.) You want the egg white mixture to be very firm, so it won’t thin out after adding the ground nuts. This way, the cookies will be easier to form as well.
  3. Combine  finely ground nuts, powdered sugar, flour, and baking powder, and carefully fold them into the egg white mixture. Use a spatula and take care not to deflate the egg whites.
  4. When using the special cookie making tool for laskonky, spray the bottom side with a cooking spray and place it onto the parchment lined baking sheet. Place about 1.5 tablespoons of meringue batter into each opening, pressing it down lightly. Level off excess batter with a knife and then carefully lift the form off, so that the cookies can fall off onto the parchment paper. Wash the form, spray it with the cooking spray again and continue making the cookies until you use up all the meringue batter. Alternatively, make the cookies with an icing bag or a tablespoon forming a small mounds and flattening them slightly.
  5. Place the cookies into the preheated oven and bake them for 15 minutes. After 15 minutes lower the temp to 176 °F (80 °C) and let them dry out slowly in a warm oven until very firm to the touch, about 30 minutes. When they are done, you should be able to easily peel them off the parchment paper. If they don’t seem to be dry enough, give them a couple more minutes in the warm oven. Let the cookies cool completely before filling.
  6. While the cookies are baking/cooling, prepare the Caramel Coffee Buttercream: Place 6 tablespoons of granulated sugar into a deeper pan. Add 2 tablespoons water and let the sugar mixture cook, not stirring, until the water evaporates and the sugar turns nice golden color. Watch the sugar closely so it doesn’t burn.
  7. Take the caramel off the heat and carefully pour in 200 ml (6.5 oz.) half-and-half (milk). The mixture will sizzle and the caramel will crystallize. Place the milk-caramel mixture over a low heat and cook, stirring constantly, to melt the caramel again. Add in the vanilla extract and the coffee.
  8. Combine cornstarch, 2 egg yolks, and remaining 50 ml (1.5 oz.) half-and-half (milk) until smooth. Combine the egg yolk-cornstarch-milk mixture with couple of tablespoons of hot caramel milk to temper it, and then add the warmed up egg yolk-cornstarch-milk mixture to the caramel coffee milk. Cook the mixture over a low heat, stirring constantly, until the mixture thickens, about 3 minutes. Let the caramel coffee pudding cool to room temperature before proceeding.
  9. Whip the soft butter until light and fluffy. By tablespoons add in the cooled caramel coffee pudding, whipping constantly, to make a light smooth crème.
  10. To assemble the cookies, sandwich two meringue cookies with about 2 tablespoons of caramel coffee crème and serve.

Gluten-free Potato Lefse (Bezlepkové zemiakové lokše)

Despite the uber-positive and uplifting post I was going for last week I have to confess the holiday craziness caught up with me after all. I was so determined not to succumb to the shopping/cleaning/wrapping insanity this year and most of all to preserve peace among our little tribe… but unfortunately I only partially succeeded. No, I didn’t join the ranks of last-minute shoppers ramming into each other in the crowded lit up shopping malls, and the Lord knows my bathrooms could still use a good scrub down. But I have to say the peace preservation part proved to be a little tricky. Even without squirreling needless stuff to wrap and with a strong resolve not to run circles with the vacuum there is always lots that still needs to be done this time of year. Add to it loads of mixed Christmas emotions and yearning to hug all the people close to my heart that are far away, and you’ve got a pot that’s ready to boil over any minute.

I think holidays are just hard – for the kids who live for weeks in anticipation of the magical Christmas moment, as well as for mothers who want so desperately to make the magic happen for those around them. (Fathers are somehow exempt from this pre-holiday pressure it seems.) The days leading to Christmas morning feel just like an amusement park train ride. The train, i.e. Mother is slowly and painfully climbing uphill: cooking the elaborate four-course menu (because it’s traditional, and keeping traditions alive is important!); wrapping cookies to share with the neighbors (what, you want to tell me being on good terms with neighbors isn’t?!); mailing out last-minute holiday cards (wishing everybody love and peace she would give her right arm for); plus doing all the ordinary stuff like laundry and bills (because neither can be put on hold and both just keep piling up, as if they didn’t know it’s Christmas time, darn it!). While stirring and whipping, Mother – the huffing and puffing amusement park Locomotive is already thinking about what needs to be scrubbed or washed or folded or mixed in where. And in the back of her mind looms this huge exclamation mark: Whatever spills/burns/doesn’t go according to the plan, please just keep keeping on. And whatever it takes, don’t yell, do you hear me? For Pete’s sake, just don’t start yapping at anybody. You know Christmas is supposed to be magical! Do you want to be the one that kills the Christmas magic? Huh? See, I didn’t think so!

And so the motherly locomotive groans and creaks while inching upward to the top, the high pinnacle all her efforts were oriented to: the festive dinner by the candlelight, happy smiles under the tree, and fleeting moments of sibling harmony. From there it only takes seconds till the train plummets back down to the starting station and Christmas is over. Scraps of wrapping paper are strewn all around the room, the kids can start fighting over the gifts, and Mother can finally pull the emergency brake and put her feet up. I confess I love the post-Christmas time. Since I can never properly judge how much food I’ll need, I always make about five times more we’re able to put away; our refrigerator shelves are subsequently bending under all the stuff, and I don’t have to lift a finger for three days straight. For me Christmas starts on the 25th 😉

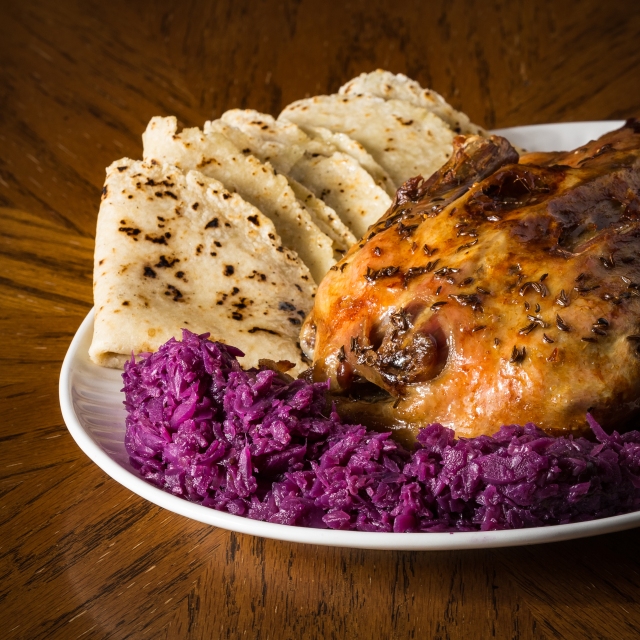
Today I present you a snippet of our post-Christmas feast assortment. In Slovakia Christmas celebrations last three days, and on the third day – Feast of St. Stephen – folks traditionally roast a goose and serve it with braised cabbage and either yeast dumplings or these potato flatbreads that are very similar to Scandinavian lefse. I roasted a duck instead of goose, and quite successfully attempted to de-glutenize potato lefse. I already mentioned a couple of times that the dough made with gluten-free flour is usually very hard to roll out, but in this case the potatoes together with a little powdered gelatin helped it to stick together much better. Another big help in the process proved to be cast iron tortilla press. With that little gadget I simply pressed small balls of potato dough between two floured sides of a cut ziploc bag, and voila – in an instant I had these thin and uniform little flatbreads. They are smaller than both the original Scandinavian lefse and their Slovak version, but since I didn’t have to slave over them with a rolling pin and they taste just the same, I don’t care one bit. Lefse are very versatile and can be eaten savory or sweet, and you can also very easily freeze them.

Happy Post-Christmas do nothing, everybody 🙂

img-2015-12-04-1189

Gluten-free Potato Lefse (Bezlepkové zemiakové lokše)

  • 700-750 g (about 25 oz.) cooked potatoes, cooled down & riced (See Note)
  • 3 tablespoons unsalted butter, melted
  • 200 g (7 oz., 1 ½ cup) all-purpose gluten-free flour
  • 2 teaspoons xanthan gum (if your flour mix contains gums already, reduce the xanthan gum to 1 teaspoon)
  • 1 teaspoon Knox powdered gelatin
  • 1 egg (about ¼ cup), beaten
  • ½ teaspoon salt (if making lefse as a savory side dish, add ¼ teaspoon salt more)

+ 1 gallon size Ziploc bag
– more gluten-free flour for flouring the Ziploc bag
– butter or duck/goose fat to coat the hot lefse

img-2015-12-04-1196

Method:
  1. Place all the ingredients in a bowl of our stand mixer fitted with a hook. With a mixer on medium speed, combine everything together into a soft dough.
  2. Divide the potato dough into small balls, about 60 g (2 oz.) each. Cut off the top of a large Ziploc bag, and then cut it down the sides to open it up completely.
  3. Making the lefse: Heat up an ungreased non-stick pan over a medium heat. Place the open Ziploc bag into the tortilla press, so that one side covers the top and the other one covers the bottom plate. Flour the plastic lightly with all-purpose flour. Place one ball of potato dough between two layers of plastic and press it down with the handle to make a thin (2 mm) pancake that’s about 8 inches (20 cm) in diameter.
  4. Carefully remove the top layer of plastic, taking care not to tear the lefse. Invert the lefse onto your left hand and peel off the bottom Ziploc layer. Place the lefse on a preheated non-stick pan and cook until browned in specks on the bottom, about 1 – 1½ minutes. Turn over and cook the other side. Remove the lefse on a plate and grease it with a bit of butter/duck fat. Dust off the flour that remained in the pan and continue making the lefse in the same way, laying them on top of each other on a plate.
  5. Serve the lefse rolled up with your favorite jam, sprinkled with powdered sugar, filled with duck liver pate as an appetizer, or as a savory side dish to accompany roasted duck and braised cabbage.
img-2015-12-04-1194
Note:

Use either russets or yellow potatoes for the dough. The potatoes need to be very cold before ricing – it is best to cook them the night before and chill them in the refrigerator. If you don’t have a potato ricer (I don’t either), you can grate the potatoes on a small-opening side of a box grater. When you mix up the potato dough and roll the balls, it is best to try to work quickly, because the potato dough gets more and more sticky with time and it’s therefore harder to work with.


Braided Christmas Bread (Vianočka)

I just glanced at my calendar and realized that Christmas will be here in less than a week: five days to be exact. Yikes. Normally at this time I’d be running around like a mad woman, taking care of last minute shopping, wrapping gifts with one hand while stirring something on the stove with the other. Oh, and continuously removing dry needles from all around the house. I love to have live tree at Christmas, but I swear the amount of needles it always brings with itself is somehow far greater than the sum of needles on its branches. And they must have feet, too, because they are all over, from the living room through the bathtub to my bed even – like tiny green pointy soldiers trying to take over the world.

This year has been strangely different. I have almost no gifts to wrap, and I haven’t caught the bug that usually sends me into the pre-holiday cleaning frenzy. We don’t have the tree up yet, either – my men decided a small pre-lit tree will do just fine, but none of them is in a hurry to actually take it out and set it up. The way I see it – we might even have one of the big photo light stands that we use when photographing my food take place of the tree this year. It’s been towering in the middle of the living room for months, and if it’s still there on the 24th, I might just hang some ornaments on it and call it good.

But the surprising thing is that none of this bugs me too much – nor the dust bunnies, nor the dirty sinks, not even the lack of a tree. Yes, I’ve been baking for weeks now, but not because of the holidays approaching, or at least not because I need to have fifteen kinds of cookies by Christmas as it used to be the case not too long ago. I’ve been baking – procrastibaking you could say – because it allows me to connect with the traditions I grew up with or people that shared their cherished recipe with me, and that need to connect always grows stronger around the holidays in me. Baking is my Zen, and while I’m rolling out that dough and pressing the cookie cutter into it, I tune out the world around, all is well, and nothing can make me to lose my cool. Well, almost nothing 🙂

This braided egg-enriched bread is traditionally baked back home around Christmas time. It’s similar to brioche or Jewish Challah, and can be braided in many different ways. Unfortunately, I haven’t been gifted with any spatial skills whatsoever and the thought of having to braid nine or ten strands of dough makes my head hurt… so I leave the elaborate preparations for professionals and stick to simple three-braid bread. Vianočka is slightly sweet and mighty tasty with its buttery taste and poppy seed or almond crunch. If you’re lucky and still have some left after a day or two, it’s also said to make a great French toast and wonderful bread pudding. It never lasts more than a couple hours around here, though! This recipe makes two loaves, so I’m hoping to hide one away in the freezer for Christmas morning.

At the height of holiday stress I’d like to wish us all may our Christmas and the days leading to it be peaceful. After all those years of pre-holiday craziness I used to for the most part bring upon me myself, I’m finally starting to really *get* that Christmas isn’t about the spotless house nor the scrumptious goodies… and it’s not about what’s under the tree, either. It’s who’s around it that matters, and if you think about it that way, you probably already have all you need. Enjoy.

img-2015-12-16-1233

Braided Christmas Bread (Vianočka)

(adapted from Nick Maglieri’s Bread)


Sponge:
  • 112g water, lekewarm
  • 14g (0.5 oz.) active dry yeast
  • 100g (3.5 oz.) unbleached bread flour
Dough:
  • 800 g (28 oz.) unbleached bread flour
  • pinch salt
  • 100g (3.5 oz.) unsalted butter, softened
  • 65g (2.5 oz.) light brown sugar
  • 3 large eggs + 1 egg yolk, room temperature
  • 2 teaspoons fresh lemon zest
  • 2 teaspoons vanilla extract
  • all of the sponge
  • 225g milk, lukewarm or room temperature

+ 1/2 cup raisins, soaked in 1/2 cup water & 1/2 cup rum
– 2 egg yolks, mixed with 2 tablespoons water – for egg wash
– poppy seed, slivered almonds, and pearl sugar – for sprinkling the top of the loaves

img-2015-12-16-1238

Method:
  1. To make the sponge, combine water, yeast and flour in a bowl, and stir with a whisk until no dry flour remains. Cover and set aside in a warm spot for 20 minutes until the sponge has doubled in size.
  2. Place flour, salt, butter, sugar, eggs, egg yolk, lemon zest, and vanilla in the bowl of your stand mixer fitted with a hook. Add in all of the activated sponge, turn the machine on a low speed, and gradually pour in the milk. Knead the dough on a low-medium speed for about 8 minutes until the dough is fairly firm, smooth and elastic (If the dough seems to be too wet, add in a couple of tablespoons flour, one tablespoon at a time; if it is too dry, add in some more milk, one  tablespoon at a time). At the end mix in the rum-soaked raisins, making sure they are evenly distributed in the dough. Transfer the dough into a well-oiled bowl, cover, and let it rise in a warm spot until it doubles in volume, about 45 min. – 1 hour.
  3. Once the dough has doubled, turn it onto a lightly floured board. Divide the dough in half. Working with one half at a time, cut off 1/3 of the dough, then cut that third into thirds again. Take the larger piece of dough (the remaining two-thirds) and cut that into thirds as well. Let the dough rounds rest under a dish towel for about 10 minutes.
  4. Assembling the breads: Start working with the three larger thirds – roll each portion into a rope about 14 – 15” (35 – 38 cm) long. Place the three strands together, pinch them at the top and braid them fairly loosely together, pinching the strands at the bottom end. Set the braid on a large baking sheet lined with parchment paper.
  5. Take the three smaller dough balls and roll each into a strand that’s about 2″ (5 cm) longer than your braided loaf. Braid these three strands together, pinching the ends to seal. With rolling pin or your hand, make a small indentation in the center of the loaf on the baking sheet, and brush the indentation with a little water. Place the smaller braid on top, and tuck its ends underneath. Set aside.
  6. Make the second loaf in the same way, placing it on a second baking sheet with parchment paper.
  7. Cover both loaves and let them rise in a warm spot until they become puffy, about 30 – 45 minutes. Preheat the oven to 350 °F ( 175 °C).
  8. Just before baking, brush the loaves with egg wash (I used two coats to achieve dark golden color), and sprinkle them liberally with poppy seeds/almonds/pearl sugar, if desired.
  9. Bake the breads for about 45 minutes, until they’re golden brown, and sound hollow when tapped on the bottom. (Check the loaves after 20 minutes, and if they seem to be browning too quickly, cover them with aluminum foil.)
  10. Cool the loaves on the baking sheets for couple of minutes, and then transfer them onto a wire rack to cool completely.