Chocolate Cherry Braided Bread

Meditation it’s the new hip thing to do, the cool buzzword you hear everywhere you go these days. It’s supposed to reduce stress, relieve pain, improve sleep, and have host of other benefits, all of which sound really good. Carving out ten minutes of your time to just sit and breathe and do nothing seems easy enough, right? Well, yes and no. Actually, not at all. You see, I’m not someone whom I’d call a meditative type. More like “OMG, there is so much to do and so little time to do it all” overwhelmed panic type. So even though I could arguably use more of that blessed peace in my life, I’ve never been able to make the meditation a part of my day. The few times I’ve tried, it usually went somewhat like this:

Om.
Keep those eyes shut, ’cause you know you’ll otherwise see a lone sock under the couch or pillows that need to be straightened!
Om.
Am I in the moment? How do I know if I’m *really* in the moment?
Om.
My stomach is growling. It’s a good thing I’m home, otherwise everyone at the yoga class would hear it, and I hate when that happens! I didn’t have breakfast. Speaking of breakfast… what will I make for dinner? Shoot, I forgot to buy broccoli! Will have to stop by at the store when I go pick up offspring # 2.
Om.
My foot is itchy. Am I allowed to scratch it, or should I just notice the itchiness and not try to do anything about it? Will have to look that up when I’m done.
Om.
Breathe in, breathe out. Come on, it’s really not that hard! Om, darn it!!!

I was under a lot of stress trying to meditate properly and fruitfully, which I’m sure kind of defeats the whole purpose of meditation. I felt defeated; I was afraid I was never going to find peace and would be condemned to a life of no sleep, and chock full of anxiety and nervous tics.

But then, baking and specifically bread making came to my rescue. Thankfully I’m old enough to know there isn’t one and only right way to do things in life, and while some folks swear by yoga and are able to meditate an hour a day, I’m probably not one of them. But hand me a sack of flour, some yeast, and pinch of sugar, and I can stand at the kitchen counter for hours. Suddenly, I don’t see the dust bunnies and don’t feel that my back is killing me. The rhythmic humming of the mixer kneading is my om. In that moment, I don’t think about yesterday or tomorrow, and I’m able to give my full attention to the bread and keep my focus on the task on hand. When I’m checking on the dough that’s coming together and listening how it moves around in the bowl, I don’t need to wonder if I’m truly in the moment; I know I am: I’m patiently adding one spoonful of flour or water at a time, and then wait until the yeast wakes up and does its magic. Baking as meditation? It works for me!

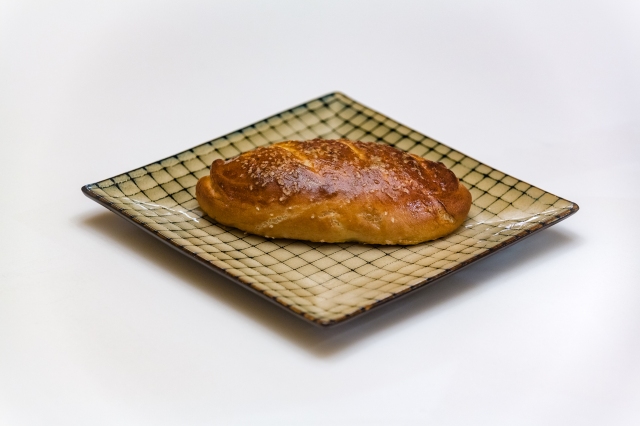
And the by-products work for my perpetually starving men, too. Recipe for this bread is similar to my Braided Christmas Bread (Vianočka); the method stays the same, but I kicked it up a bit by adding chocolate and chopped cherries into the dough. I wasn’t sure how it’ll turn out at first; the jarred cherries were rather juicy, and even after soaking up the extra moisture with paper towel they were a bit hard to roll up in the dough. But the end result was well worth the effort – the bread was soft and buttery and there were bits of cherry and chocolate in every bite. Next time, I want to try to roll up some apricot jam into the dough before braiding it, or maybe finely chopped dried fruit with cinnamon… The possibilities are endless 🙂

img-2017-01-14-9471

Chocolate Cherry Braided Bread

Sponge:
  • 55 g lukewarm water
  • 7 g (2.5 oz.) active dry yeast
  • 50 g (1.75 g) strong bread flour
Bread dough:
  • 400 g (14 oz.) unbleached bread flour
  • pinch salt
  • 50 g (1.75 oz.) unsalted butter, softened
  • 33 g (1.25 oz.) light brown sugar
  • 2 eggs + 1 egg yolk, room temperature
  • 1 teaspoons fresh lemon zest
  • 1 teaspoon vanilla extract
  • all of the sponge
  • 110 g whole milk, lukewarm or room temperature
Filling:
  • 125 g (4.5 oz) dark chocolate, finely chopped
  • 3 tablespoons sugar
  • 3 tablespoons unsalted butter, softened
  • 270 g (9.5 oz) jarred cherries in syrup (drained weight)
  • 1 teaspoon cinnamon

+ 1 egg yolk, mixed with 1 tablespoon water – for egg wash
– poppy seeds and pearl sugar for sprinkling, if desired

img-2017-01-14-9478

Method:
  1. To make the sponge, combine water, yeast and flour in a bowl, and stir with a whisk until no dry flour remains. Cover and set aside in a warm spot for 20 minutes until the sponge has doubled in size.
  2. Place flour, salt, butter, sugar, eggs, egg yolk, lemon zest, and vanilla in the bowl of your stand mixer fitted with a hook. Add in all of the activated sponge, turn the machine on a low speed, and gradually pour in the milk. Knead the dough on a low-medium speed for about 8 minutes until the dough is fairly firm, smooth and elastic (If the dough seems to be too wet, add in a couple of tablespoons flour, one tablespoon at a time; if it is too dry, add in some more milk, one  tablespoon at a time). At the end mix in the rum-soaked raisins, making sure they are evenly distributed in the dough. Transfer the dough into a well-oiled bowl, cover, and let it rise in a warm spot until it doubles in volume, about 45 min. – 1 hour.
  3. Meanwhile, prepare the filling: Chop the chocolate and set it aside. Drain the cherries, chop them roughly and pat them dry with paper towel. Set aside.
  4. Making the bread: When the dough has doubled, transfer it onto a lightly floured surface. Divide it into 5 equal portions (if making a 5-strand braid), or 3 portions (if making a simple 3-strand braid). Form each portion into a ball, and let the balls rest under a dishtowel for 10 minutes. Line a big baking sheet with parchment paper.
  5. Roll each piece of dough into an 35 x 12 cm (14 x 5 inches) oblong. Spread the dough with 1 tablespoon of softened butter, and sprinkle it with 1/5 of the chocolate and 1/5 of prepared cherries. Sprinkle the filling with some cinnamon and roll it up tightly starting from the long side; pinch the edges to seal. Braid the ropes together, tuck the ends under, and transfer the bread onto the prepared baking sheet. Cover and let the bread rise second time until light and puffy, about 30 – 45 minutes. Preheat the oven to 350 °F ( 175 °C).
  6. Brush the bread with egg wash (I used two coats to achieve dark golden color), and sprinkle with seeds and pearl sugar if desired. Bake the bread for about 45 minutes until golden brown in color. (Check the bread halfway through baking and give it another coat of egg wash in places that have become exposed due to oven spring. If the loaf seems to be browning too quickly, cover the top with aluminum foil.)
  7. Let the bread cool on the sheet for 10 minutes and then transfer it to a cooling rack to cool completely before slicing. It’s also possible to slice it and freeze it; the slices reheat well in a toaster. This bread also makes a wonderful French toast or bread pudding.

Beer Pretzel Rolls

Beer is without a doubt one of God’s best creations and gifts to man. When Mr. Photographer was diagnosed with celiac, he embraced his new gluten-free way of life pretty quickly; we learned to bake decent gluten-free breads and found substitutes for most of his beloved foods. It’s been a couple of years, and I think the only thing he still truly misses is a good ol’ beer. There are gluten-free beers on the market, of course, but none of them is really on par with the real stuff. There is nothing quite like a cold beer on a hot summer day. It’s the ultimate fizzy treat, loaded with vitamins and minerals, and for that reason is often dubbed liquid bread. Beer and bread are actually closely related and originate from the same starting point: in their most basic form, they’re both made with same ingredients, just cereal and water. The yeast eats the sugars and multiplies, which in turn causes rising and produces alcohol. In contrast to beer fermenting process, most of the alcohol is unfortunately going to be burned off in baking, but even so, there are many reasons to experiment with beer in the kitchen: it adds a subtle malty sweetness to baked goods, and makes them lighter and crispier as well.

In all my years living in the States, I’ve never managed to develop the taste for the pillowy soft and squishy white bread sold in supermarkets. I need something hearty and substantial to sink my teeth into (not to mention all that sugar in commercially made breads makes my hair stand up on end). I make all gluten-free breads we eat, and 99 percent of gluten bread our men-sons consume. I like to know what’s in our food, and it does my mother’s heart (and I’ll be honest, my pride!) good to hear them saying “Could you bake something? We’re out of bread!”, even though there is store bought bread sitting in our freezer, and has been there for weeks – still wrapped up and untouched.

So as my first bake of 2017 I present to you bread the way we like it: crispy from the outside and chewy on the inside, pleasantly salty, with wonderfully crisp crust. These rolls are great dunk in a hot soup, even better as hot dog buns and make wicked good sandwiches with salami and cheese. Their secret ingredient? Beer. Don’t worry, it’s not at all overpowering – actually adds just a touch of sweetness and interesting taste you’re not sure where is coming from. The dough is easy to make and a dream to work with, and the scraps are great for pretzels: sprinkled with coarse salt and seeds and dipped in mustard, they’re the greatest little bites of beer to share with friends.

Turns out, you can have your beer and eat it too! How awesome is that?! Cheers to the new year – may we all continue to bake the world a better place!

img-2017-01-07-9457

Beer Pretzel Rolls

(makes 8 rolls)

Dough:
  • 500 g (17.5 oz.) strong bread flour
  • 1 tablespoon dark brown sugar
  • 1 teaspoon salt
  • 40 g (about 3 tablespoons) unsalted butter, softened
  • 200 ml (oz.) lager
  • scant 150 ml (5 oz.) full-fat milk
  • pinch sugar
  • 2 teaspoons active dry yeast

+ 1 ½ liters water with 3 tablespoons baking soda – for water bath
+ 1 large egg yolk, mixed with 1 tablespoon water – for egg wash
+ coarse salt & various seeds (optional)

img-2017-01-07-9461

Method:
  1. To make the dough: Combine lukewarm milk with pinch of sugar and yeast; let stand for 15 minutes to activate.
  2. Place all the remaining ingredients in the bowl of your stand mixer fitted with a dough hook. When the yeast mixture looks nice and bubbly, add it to the flour and start mixing on a low speed. If the dough looks too dry, add in couple more tablespoons of milk, 1 tablespoon at a time; if it’s too wet, sprinkle in more flour. Continue kneading until the dough comes together in a ball, and it’s soft, smooth, and elastic, about 15 minutes. Transfer the dough into a well oiled bowl, cover with plastic wrap and let rise in a warm, non-drafty place for about 1 hour, until it doubles in volume.
  3. Making the rolls: Divide the dough into 8 equal portions, each around 100 g (3.5 oz.) Form small balls and then roll each one into a sausage about 15 cm (6 inches) long. Place the rolls with enough space between them onto baking sheets lined with parchment. Cover and let them rise in a warm spot for about 30 minutes. Preheat the oven to 400 °F (200 °C).
  4. In a large enough pot, bring water and soda to a simmer. Working with one roll at a time, carefully lower it into the water, cook for 30 seconds, turn it over, and cook it for 30 seconds more. With a slotted spoon, remove the roll from the water and place it onto a parchment lined sheet. (Baking soda bath gives the rolls distinctive flavor and helps with browning as well.)
  5. Brush the rolls with egg wash, score with a sharp knife or baker’s lame, sprinkle with coarse salt and seeds, if using, and bake them in the preheated oven for about 15 – 20 minutes, until the rolls turn deep brown. Don’t try to rush the process and don’t take them out too soon – you want them dark; this way they will be crispy on the outside and chewy on the inside.
  6. To make pretzels, divide the dough into equal portions, each about 50 g (1.7 oz.). Roll each piece into a long rope and twist into pretzel form. Let the pretzels rise the second time on baking sheets, give them a coat of egg wash, sprinkle them with salt/seeds, and bake at 400 °F (200 °C) for 12 – 15 minutes.
  7. The rolls are best on the day they’re made, but can be frozen and reheated/freshen up in the oven.

Slovak Honey Cake with Caramel Buttercream and Roasted Nut Streusel Topping

Christmas is almost here! Tis the season to be overwhelmed – there is still so much to do and never enough time (and energy) to do it. I love Christmas – the traditions, the smells, the lights, and the family time… just getting there can be a bit too taxing. The calendar is filling up, and I feel like I’m terribly behind this year. Haven’t really started baking yet – I know from experience that if I get into Christmas baking too early, my men who eat like locusts will push right behind me and consume everything in sight, and I’ll have to break out the rolling pin three days before Christmas anyway. Same with cleaning – it’s just a never ending losing battle. No point in needlessly spending precious energy too soon 🙂

This cake is a forerunner of the serious Christmas cookie baking marathon that will take place at our house next week. There are desserts that simply cannot be absent from a holiday table in a Slovak household, and this is definitely one of them. However, its preparation is time consuming, and involves lots of fighting with a fragile honey dough: first with a rolling pin, when you need to roll out 4 – 6 thin layers of a soft sticky dough, and when that’s done, you need to convince said layers to agree to be transferred on and off baking sheets without tearing. All that rolling as well as need for careful handling can be daunting, and when you’d heaven forbid like to de-glutenize the cake on top of that, it holds true hundred times as much. But since this cake is a Christmas must-have for Mr. Photographer, last year I went on a mission to find a way to make it gluten-free for him, even if it should kill me. (In case you’re wondering, food is my love language, and I’m willing to go great lengths to make good food for people I care about. I’ve wished many times upon seeing the sad state of my bathrooms I could switch to cleaning love language for a while, but alas, I don’t see that happening any time soon).

Anyway, in my search I learned that many Slovak ladies must dislike the fighting the honey dough with a rolling pin just as much as I do, because some wonderfully clever soul apparently succeeded in modifying the recipe from a dough that needs to be rolled out to a honey sponge cake with seemingly no adverse effects to the appearance and taste. I made the cake in both gluten and gluten-free versions last year and it was a big success; I was quite happy with it and haven’t anticipated to ever need another recipe. Well, since before the beginning of November my inbox has been overflowing with must try Christmas recipes, and among them I bumped into yet another best recipe for the Slovak honey cake. This time, cake layers were rolled, but the author claimed the rolling to go swimmingly easy, and to top it off, there supposedly wasn’t any wait time till the cake layers soften under the filling, so the cake was to be consumable right away. Of course I was intrigued and had to try it! I found all the claims to be absolutely true, and last year’s favorite had to concede to a new winner. As far as I’m concerned, this honey cake recipe truly is the best: Gluten-full or gluten-free, the rolling was a breeze, and as promised, the cake layers didn’t get hard when cooled, and were soft as a pillow from the get go. I suspect the rum syrup I very generously soaked them with might have had something to do with it 🙂

So this version is another take on a traditional Slovak Christmas delicacy. And since men are inherently simple, I don’t think I’ll need to do much more for Mr. Photographer’s Christmas 🙂 If you like honey, and caramel, and nuts (and who doesn’t?!), and have time to spare in the upcoming pre-Christmas week, give it a try; it’s heaven in your mouth delicious!

img-2016-12-04-8759

Slovak Honey Cake with Caramel Buttercream and Roasted Nut Streusel Topping

Honey dough for 5 cake layers:
  • 45o g (1 lb.) all-purpose flour (for gluten-free cake, see Note)
  • pinch salt
  • 1 ½ teaspoons baking soda
  • 1 teaspoon dark cocoa powder
  • 180 g (6.3 oz.) powdered sugar
  • 180 g (6.3 oz.) unsalted butter, softened
  • 1 large egg
  • 6 tablespoons liquid honey
  • 4 tablespoons whipping cream
Caramel Buttercream:
  • 1 can sweetened condensed milk (397 g, 14 oz.)
  • 70 g (2.5 oz.) dry roasted ground walnuts/pecans
  • 250 g (8.5 oz.) unsalted butter, room temperature
Rum Syrup:
  • 2 ½ tablespoons granulated sugar
  • 1.5 dl (5 oz.) boiling water
  • 50 ml (1.7 oz.) dark rum
Roasted Nut Streusel:
  • 30 g (1 oz.) dry roasted ground walnuts/pecans
  • 50 g (1.7 oz.) honey cake crumbs (scraps of the remaining dough, re-rolled, baked, then finely ground)

img-2016-12-03-8755

Method:
  1. The day before, caramelize the sweetened condensed milk: Place an unopened can of sweetened condensed milk in a pot of water, so that the can is fully submerged. Cover the pot, bring the water to a boil, and simmer for 2 hours. Remove the can from water, let it cool, and refrigerate, still unopened, till the next day. Next day, let the can come to room temp and continue with the recipe.
  2. Make the honey cake layers: Place butter, sugar, egg, honey, and cream into a deeper saucepan. Place the saucepan into a bigger pot filled with water, creating a water bath. Over a medium heat, warm up the mixture, whisking constantly. Do not boil.
  3. Combine flour, cocoa, salt, and baking soda in a bowl of your stand mixer. Pour the warm honey butter mixture into the dry ingredients, and mix up a soft dough. Gather the dough into a ball and wrap it up in saran wrap. Set it aside to cool slightly.
  4. Get ready 2 or 3 bigger baking sheets and preheat the oven to 350 °F (180 °C). Cut 5 sheets of parchment paper. With a pencil, trace 22 cm (8.5 inches) circle on each of the sheets and turn the paper over, so that the dough won’t touch the pencil marks. Divide the dough into 5 equa portions, each about 190 g (6.7 oz.)
  5. Take one sheet of parchment, place one portion of dough into the center of the pre-traced circle and roll it out. You can flour the dough or your rolling pin if you need to, but I found it wasn’t necessary. Reserve the scraps of dough for later.
  6. Bake the cake in a preheated oven for about 4 – 6 minutes, till the edges turn light golden brown. The dough will still be very soft, it will firm up when cooled. Don’t overbake the layers, or they will be hard. Let the circle slightly cool on the baking sheet, and then remove it from the sheet, but let it rest on the parchment. Prepare all the remaining layers in the same way and let them cool. Re-roll the scraps into an oval/circle and bake it as well. Don’t try to handle the dough while it’s still hot/warm, or it will break. The dough is very easy to handle when cooled. (The cake layers can be made in advance and frozen with sheets of parchment between them. Defrost them completely before filling them with buttercream.)
  7. While the cake layers are cooling, prepare the rum syrup and caramel buttercream. For the syrup, dissolve sugar in hot water. Let the sugar syrup cool and then pour in the rum and combine. For the buttercream, whip the butter until light and fluffy. By spoonfuls, add in the caramelized condensed milk, whisking constantly. Add in the ground nuts and combine.
  8. Assembling the cake: Place the first cake layer onto a flat surface, covered with parchment. Smear the cake with approx. 20 ml (0.6 oz.) rum syrup, and coat it with 1/5 of the buttercream. Take second cake layer, brush it with 20 ml (0.6 oz.) rum syrup, and then use another 20 ml (0.6 oz.) syrup to soak the other side. Place the cake on top of the buttercream. Continue assembling the cake, using 2 x 20 ml (0.6 oz.) rum syrup for each layer, and covering it with 1/5 of the caramel buttercream. Frost the top and the sides of the cake and set it aside.
  9. For the streusel, process the baked scrap of honey dough into crumbs, and combine them with ground nuts. Scatter the streusel evenly all over the cake, covering top and the sides, pressing the streusel lightly into the buttercream. Let the cake stand in a cool place for about 2 hours to let the buttercream soak into the layers a little (I usually cover it with a big bowl and put it in the garage), and then refrigerate for 12 – 24 hours before cutting and serving. The remaining cake can be frozen.
Note:

For gluten-free cake, I used Bob’s Red Mill 1 to 1 gluten-free flour. It already contains gums, so no other adjustments were necessary. When I don’t have time to mix my own flour mix, it is my absolute favorite flour mix for baking.

Gingerbread Cake with Mascarpone, Lemon Curd and Cranberries

The turkey is gone, visitors left,  and with just couple more inches around the waist to remind us we once again overdid it on Thanksgiving, we swayed over to the Christmas season. I love this time of year. The preparations, the anticipation, all of it. It can be stressful, that’s for sure – trying not to forget anything or anybody, manage to do all that’s needed in time, and not to (or at least want to) kill somebody in the process!

In trying times like this I strongly believe in baking aromatherapy. I adore the scents of the season: vanilla, cinnamon, ginger, and nutmeg always shroud the entire house and are able to miraculously make one happy and content. For me, baking is the ultimate stress reliever – all that mixing and stirring can be really therapeutic, and I truly think licking chocolate off the beaters and eating raw cookie dough can ward off any kind of sadness. I also believe in the power of baked goods, made with fresh ingredients, real butter, and a whole lot of love. All that being said, I’m really not too fond of making Christmas cookies. There, I said it – really a sacrilegious thing to say for a food blogger, I guess… but it’s the truth. I’m not the most patient soul in the world, and while I have nothing against eating cookies mind you, making them is whole another story. Yes, they’re cute, and they’re wonderfully portable and shareable, but I find all that rolling and cutting out shapes… annoying? Too much trouble? I’m not sure. I just like to be efficient, I think. In the time it takes me to arrange fifty cookies on the sheets and get them in and out of the oven, I can make a soup, a loaf of bread to go with it, and maybe even some simple cake to sweeten up the dinner. So whenever possible, I try to wriggle out of making cookies, and choose to bake something – anything! – else.

But for Christmas, cookies are somewhat of a requirement, and being the responsible mother that I am, I stand at the counter cutting out cookie after cookie year after year, secretly grinding my teeth. Traditions are important, and so even though I’d really like to just run, run, as fast as I can so that gingerbread man making wouldn’t catch me, in the end my responsible motherly side always prevails and my kitchen production line spews out plethora of festive holiday sweets. This year though, I dug up a recipe for a gingerbread cake that sounded like a dream come true – sweet and moist, interlaced with lemon curd, homemade cranberry preserves, and covered in light and airy mascarpone crème. I immediately resolved to make it, secretly hoping it would turn out to be my winning ticket for not having to bake cookies this holiday season… or at the very least the gingerbread ones. This cake is chock full of cinnamon, cardamom and nutmeg, thus provides all the olfactory pleasures we’ve come to associate with Christmas, but without all that rolling and cutting. And the two kinds of fruit filling and mascarpone frosting take it to another level entirely – the fusion of tart and sweet, and crumbly and creamy offers an unexpected and most delicious harmony of contrasts. This aromatic rum soaked baby is really worth a try!

img-2016-11-28-8748

Gingerbread Cake with Mascarpone, Lemon Curd, and Cranberries

Cake:
  • 390 g (13.75 oz.) all-purpose flour
  • 1 ½ teaspoons baking soda
  • 3/4 teaspoon salt
  • 2 teaspoons ground ginger
  • 1 ½ teaspoons cinnamon
  • ½ teaspoon cloves
  • 1/2 teaspoon cardamom
  • pinch black pepper
  • pinch coriander
  • 170 g (6 oz.) unsalted butter, softened
  • 125 g (4.5 oz.) granulated sugar
  • 3 eggs, room temperature
  • 150 g (a little over 5 oz.) molasses
  • 180 g (6.3 oz.) buttermilk
Cranberry preserves:
  • 300 g (10.5 oz.) fresh or frozen cranberries
  • 180 g (6.3 oz.) granulated sugar
  • 1 teaspoon fresh lemon zest
  • ½ teaspoon vanilla
  • 125 ml (½ cup) apple cider
Lemon curd:
  • 3 egg yolks
  • 50 g (1.75 oz.) granulated sugar
  • 50 ml (1.7 oz.) fresh lemon juice (approximately 1.5 lemons)
  • 38 g (1.4 oz.) unsalted butter
  • fresh lemon zest from 2 organic lemons


Mascarpone frosting:
  • 400 g (14 oz.) mascarpone cheese
  • 100 g (3.5 oz.) powdered sugar
  • 100 ml (3.4 oz.) heavy whipping cream
Sugared cranberries:
  • 250 ml (1 cup) cider
  • 190 g (6.7 oz.) granulated sugar
  • 125 g (4.5 oz.) fresh cranberries
  • granulated sugar to roll macerated fruit in

+ 12 tablespoons spiced rum (or mixture of rum extract and water) to moisten the cake layers

img-2016-11-28-8745

Method:
  1. Start by making sugared cranberries the night before: In a small saucepan, combine cider and sugar. Cook until sugar dissolves. Let the mixture cool completely. Add in the cranberries, cover, and let them macerate in the syrup overnight. The next day, finish making sugared cranberries and proceed with making the cake.
  2. Sugared cranberries: Line a big baking sheet with parchment paper; set aside. Remove cranberries from the syrup into a colander. Dry off the excess liquid with paper towels; you want the cranberries to be moist, but not dripping wet. Pour some granulated sugar into a small bowl. Place 4 – 5 cranberries into the bowl and shake the bowl gently to cover them in sugar. Place the sugared cranberries onto the lined baking sheet so that they don’t touch each other and continue making the rest of the cranberries the same way. Don’t rush the process and resist the temptation of dumping too many/all the cranberries into the sugar at once – the sugar will clump up and you’ll need to start over. Let the cranberries dry out on the baking sheet while you make the cake and fillings.
  3. To make the cake, line a 20 cm (8 inch) round springform pan with parchment paper. Lightly butter and flour the sides. Preheat the oven to 350 °F (176 °C).
  4. In a bowl, combine flour, baking soda, salt, and spices; set aside. In a separate bowl, whip butter with sugar until light and fluffy, scraping down the sides of the bowl. One by one, add in eggs, mixing well after each addition. Pour in molasses and mix. Lastly, add in the buttermilk alternating with flour mixture. Mix just until combined; do not overmix. Pour the batter into prepared springform pan and smooth out the top. Bake the cake in the preheated oven for about 45 min. – 1 hour, until the cake springs back when lightly touched and the cake tester inserted in the center comes out clean. Let the cake cool in the springform pan for about 30 minutes and then release the springform mechanism, remove the cake onto a cooling rack and let it cool completely.
  5. While the cake is cooling, make lemon curd and cranberry preserve filling. (Both can be made in advance and kept in the refrigerator). For the lemon curd, combine egg yolks, lemon zest, lemon juice, and sugar in a small saucepan. Place the saucepan into a bigger pan filled with water, creating a water bath, and set the saucepans over a medium heat. Cook, stirring constantly, until the mixture thickens and coats the back of the spoon, about 5 – 7 minutes. Remove from heat and whisk in butter. Let cool completely before proceeding. Cover and refrigerate if not using right away.
  6. For the cranberry preserves, combine cranberries, cider, sugar, zest, and vanilla in a saucepan, and cook, stirring, for about 20 – 30 minutes, until the compote thickens to a jam consistency. Set aside and let cool; cover and refrigerate if not using right away.
  7. Mascarpone frosting: Whip mascarpone cheese with sugar until well combined. In a separate bowl, whip heavy cream until firm peaks form. Carefully fold the whipped cream into mascarpone. Set aside.
  8. Assembling the cake: With a serrated knife, level the cake top and cut the cake into four layers. Place the first cake layer onto a plate and sprinkle it generously with 3 tablespoons of rum or rum extract combined with water. Spread the first layer with half of the cranberry preserves.
  9. Place second cake layer on top of the cranberries, douse it again with 3 tablespoons of rum/rum extract and water, and spread it with cooled lemon curd.
  10. Cover the lemon curd with third cake layer, sprinkle it with rum or rum extract mixture and spread it with remaining cranberry preserves. Cover with last cake layer and douse it with rum/rum extract mixture again.
  11. Frost the top and sides of the cake with mascarpone frosting, and refrigerate for at least 4 hours before cutting and serving. Right before serving, decorate the cake with sugared cranberries.

img-2012-11-26-1046


Eggnog Cheesecake with Gingersnap Crust

I know, I’m getting way ahead of myself. I should be making pumpkin pies and complaining about the crust not turning out as flaky as I’d like it to, stuffing the bird, and pondering ways to upgrade the forever boring green bean casserole. And I am or will be doing that – with the exception of pumpkin pie, which nobody at our house is too fond of. I know, that’s so un-American… and rather surprising, too, because I literally adore everything pumpkin, soups, muffins, cakes, all but the actual pumpkin pie. I find it too wet and overly sweet, honestly a waste of the great pumpkin, which could be used in hundreds of other delicious ways. And since I’m in a confession mode – even our Thanksgiving will be very low-key. Yes, there will be cooking, because, well, with three constantly hungry men in the house there really isn’t a way to get out of that, but cooking aside, Thanksgiving to us is just another Thursday – with more food that is. And we sure are grateful for that 🙂

Mr. Photographer found the recipe for this cheesecake somewhere on the internet, and when I saw it, I immediately decided to heck with rules, I’m definitely not going to wait another month to make this beauty. Frankly, it might be a week before Thanksgiving, but when you look around in the stores, it’s beginning to look a lot like Christmas anyway. And with everything that’s been going on in the world around us lately, a little (or a lot!) of eggnog could go a long way to help us cope. Everyone fights his own way… my superpower is to bring people together with food, so that’s what I plan on continuing to do.

Making homemade eggnog is the easiest task of all… at least eggnog the Slovak way, which doesn’t require cooking. You simply whisk egg yolks with sweetened condensed milk and vanilla, and pour in a good rum. Done. The hardest part is the waiting afterwards, because it’s best to bottle the eggnog and let it sit for two weeks before serving. It thickens, the flavors will have chance to marry, and it’ll be absolutely delicious. Please don’t leave me over the irresponsible practice of consuming raw egg yolks – according to some statistics I found, if I eat three raw egg yolks a day (which I don’t), it would take me more than 27 years before I’d actually run across one with salmonella. I’ve decided the best things are worth the risk, and have been happily sipping on homemade eggnog for years. And in any case, we’ll be pouring the eggnog into the cheesecake filling and baking it, so any potential danger will be eliminated… along with the alcohol content unfortunately 🙂

So keep calm and have some eggnog – first in the cheesecake, of course, but don’t forget to pour yourself some in a glass, too. It might help you stay sane during the upcoming busy holiday season 🙂

img-2016-11-17-8685

Eggnog Cheesecake with Gingersnap Crust

(adapted from http://www.rosebakes.com)

Homemade Eggnog:
  • 2 cans (396 g, 14 oz. each) sweetened condensed milk
  • 5 egg yolks
  • 2 teaspoons vanilla extract
  • 500 ml (2 cups, 16 oz.) good quality rum
Gingersnap Crust:
  • 340 g (12 oz.) gingersnap cookies (I used gluten-free ones)
  • 6 tablespoons (85 g, 3 oz.) unsalted butter, softened
  • ¼ cup (55 g, scant 2 oz.) granulated white sugar
  • ¼ teaspoon cinnamon
Cheesecake Filling:
  • 4 bricks (8 oz., 225 g each) cream cheese, softened
  • 4 eggs, room temperature
  • 1¼ cups granulated white sugar
  • 1¼ cups eggnog, see Note
  • 3 tablespoons all-purpose flour (I used gluten-free flour mix)
  • 1 teaspoon rum (or rum flavoring)
  • ½ – 1 teaspoon cinnamon (to taste)

img-2016-11-17-8677

Method:
  1. To make the eggnog, whisk together sweetened condensed milk, the egg yolks, and vanilla. Pour in the rum and combine. (It is best to make the eggnog in advance and let it sit for 2 weeks so that it has time to thicken.)
  2. To make the crust, line a 25 cm (10 inch) springform pan with parchment paper and lightly butter the sides. Crush the cookies in a food processor and transfer them to a bowl. Add in the remaining ingredients and mix until the mixture is sticky and holds together. Press the cookie mixture on the bottom and up the sides of your pan. (I use a glass for this task – the crust looks nicer and “cleaner” this way). Set aside. Preheat the oven to 325 °F (162 °C) and place a pan with water on the bottom rack.
  3. Make the filling: In a large bowl, mix the cream cheese until light and fluffy. One by one, add in the eggs, mixing well after each addition. Pour in the eggnog and mix until smooth. Add the remaining ingredients and combine.
  4. Pour the filling onto the crust in your pan and smooth out the top. Bake the cheesecake for 1 hour and then turn the oven off and crack the oven door. Let the cheesecake in the oven for 1 additional hour and then take it out and let it cool completely before chilling for at least 6 hours.
  5. Decorate the cheesecake with whipped cream, ground cinnamon, chocolate shavings or fruit and serve.
Note:

My eggnog was not as thick as I would have liked, so I reduced its amount to 1 cup only, and it worked well. See how thick/thin your filling is and make adjustments as needed.

Try not to overmix the cheese filling – if you do, there will be too many air bubbles in the filling, and the cake puffs up too much when baking and then falls when it cools. The dreaded cracks might also develop on the surface. The water in another pan in the oven as well as gradual cooling of the cheesecake in the oven might help to prevent them, but if you end up with cracks in your cheesecake, don’t lose heart: you can repair it with hot water and an offset spatula, and there are many ways to cover them too – you may mix up some dark chocolate ganache glaze and pour it over the top, or just pile up fresh fruit on the cheesecake. Cracks or no cracks, the cheesecake is going to be delicious!

Burnt Zombie Hand Meatloaf with Mashed Potato Ghosts

It’s that frightful time again: time to cast some nasty spells, and to eat, drink, and be scary. No, silly, not PMS… although yes, in our household all of the above applies during that week of the month too: If I don’t have enough wine and chocolate on hand, it has the potential to not turn out pretty and someone might even get hurt. But this time I’m talking about Halloween – the creepy and excessively orange fall holiday that’s quickly approaching.

When you think about it, all of us desperate (house)wives should just love Halloween – it’s the one time when you don’t need to feel ashamed of your less than stellar housekeeping skills and can proudly display all the cobwebs creeping from the corners of your house, and there is no need to bother with make-up when going out either, because if you dig out some holey old hat and jam it on three day old hair, you can pretend you’re going as an old witch for Halloween, and all the zits, red splotches, and dark circles are part of the character you just spent an hour to create.

Despite all of the obvious advantages and years of living in the jack-o-lantern loving land, I admit Halloween still hasn’t quite grown on me. I’m not exactly sure why… maybe because if I’m to be honest I don’t really enjoy random strangers coming up to my door? Or perhaps it’s the fact that I am way too easily startled and literally jump up and yell when Mr. Photographer as much as says “honey, I’m home” behind my back? I really and truly don’t need any moving blinking skeletons lurking around the corner! And it probably doesn’t help that I’m well over the trick-or-treating age and can’t collect candy door to door anymore 🙂 (Mother’s confession: I used to secretly steal couple of chocolates from the boys’ baskets, hide in the pantry and binge on them on Halloween night – but hey, I didn’t want my offspring to end up with cavities or become obese at a young age, plus, I more than deserved some chocolate after dealing with them on their Halloween sugar high!)

Anyway, I might not be too keen on Halloween, but I still love my kitchen playground, and Halloween without a doubt offers wonderful opportunities to play, so I’ve resolved to make peace with it. Last year we made these  Halloween eyeballs that turned out so realistic that the boys refused to touch them and poor Mr. Photographer had to eat them all. Such sacrifice on his part, all that sweet and creamy panna cotta… but what a guy wouldn’t do to make his wife happy 🙂 This time I wanted something equally gruesome, and at the end I’ve decided to try my hand at the burnt zombie hand meatloaf. I’ve never been one to follow recipes closely, and am more of a “a little bit of this and a pinch of that” kind of person, and even though I think of myself as more of a baker than cook, cooking actually lets you to play more compared to baking. If you forget to add baking soda or some other leavening when making a cake, your cake will probably be more brick-y than cake-y. But in cooking it doesn’t really matter if you use one or two teaspoons of oregano, or if you omit it altogether. So I was happy to play cook for a change, and as you can see, I had too much fun! I planned to get a gelatin hand mold from Amazon, but of course forgot about it until it was too late. I had to improvise, and a basic cleaning glove came to the rescue. The meatloaf was gently poached and then baked in the oven with some cheese on top to give the hand that halloweenish burnt skin look. I tried to make it as realistic as I could, complete with the purple onion nails and white onion bone sticking out. I also whipped up some mashed potatoes and piped them into bootiful little ghosts – and dinner was served. I wasn’t sure if my men would declare it yum or yuck… but they were happily ripping off the fingers one by one, stuffing their faces and making repulsive jokes the way only teenagers can.

So if you happen to have a pound of hamburger in your freezer, give this eerie meatloaf a try. It’s terrifyingly easy to make, and finger-licking delicious – a perfect candidate for a fright night dinner!

img-2016-10-23-7583

Burnt Zombie Hand Meatloaf with Mashed Potato Ghosts

For the meatloaf:
  • a little over 1 lb. (450 g) ground beef
  • 1 medium onion, diced
  • 2 cloves garlic, minced
  • 4 strips bacon, diced
  • 2 slices bread, ground up
  • handful of parmesan, grated
  • handful of fresh parsley, chopped
  • 1 egg
  • 1 tbsp. Dijon mustard
  • 2 teaspoons oregano
  • salt & pepper to taste
  • extra cheddar cheese (for the meatloaf skin)
  • red onion (for nails)
  • a glove
For the blood curling red sauce:
  • 2 tablespoons olive oil
  • 1 fresh chilli pepper, minced
  • 425 g (15 oz.) can of small white beans
  • 425 g (15 oz.) can of diced tomatoes
  • 1 cup (250 ml) beef/chicken broth
  • 2 tablespoons tomato paste
  • 2 teaspoons Tabasco sauce
  • salt & pepper to taste
For mashed potato ghosts:
  • 1 kg (2 lbs.) yellow potatoes, peeled and diced
  • 2 tablespoons butter
  • up to ½ cup sour cream
  • 2 egg yolks
  • salt & pepper to taste
  • small can of sliced black olives

img-2016-10-23-7580

Method:
  1. To make the Zombie hand: In a big bowl, mix all the ingredients for the meatloaf. Season to taste and combine well. Pack the mixture tightly into the glove, making sure there are no air bubbles. Close up the top of the glove with a rubber band or string and place the filled glove into a Ziploc bag. Poach the meatloaf in boiling water for 30 minutes.
  2. While the meatloaf is cooking, prepare the red sauce: Sauté the onion in olive oil for couple of minutes until softened. Add in all the remaining ingredients except beans and cook for about 15 minutes, stirring occasionally,  until the mixture thickens to your liking. Mix in the beans and combine. Season to taste.
  3. When the 30 minutes are up, carefully remove the meatloaf hand from the water and let it cool completely still in the glove. Transfer the glove into a baking pan and cutting away pieces of glove with scissors, carefully remove the meatloaf. (I didn’t need to, but if a finger falls off, you should be able to re-attach it with a toothpick). Preheat the oven to 350 °F (176 °C).  Pour the red sauce around the meatloaf in the pan. Brush some of the sauce on the meatloaf and sprinkle the meatloaf generously with cheddar cheese. Cut out the nails from the red onion and place them on fingers. Bake the meatloaf for about 30 minutes, until the cheese melts and forms a nice crust. (I covered the nails with aluminum foil at the end, and placed the meatloaf under a grill for couple of minutes. If you do this, watch the meatloaf closely so it doesn’t burn. 1 – 2 minutes should be enough.)
  4. For the mashed potato ghosts, cook the potatoes in salted water until soft. With a potato masher, mash them up with butter and sour cream. (Add the sour cream gradually, and don’t overdo it – you need the mixture to be pretty thick so that the ghosts will stand up when piped onto the baking pan. The original recipe actually called for milk, so I used it, and then had trouble to keep my ghosts upright 🙂
  5. Form the ghosts: Butter a baking pan or line it with parchment. Preheat the oven to 350 °F (176 °C).  Transfer the potato mixture into a big Ziploc bag, cut off one corner, and form small conic mounds onto the parchment. Using sliced olives and peppercorns, create faces on your ghosts. Bake the ghosts for about 10 – 15 minutes, until they firm up and turn nice golden brown on top. If they’re not browning enough, put them under the grill as well for a minute.
  6. Put the zombie hand onto a serving plate, arrange a couple of potato ghosts around, lovingly invite your family to the dinner table, and watch them freak out 😀

img-2016-10-23-7568

Pear Upside Down Cake with Pomegranate Caramel and Walnuts

Last weekend marked our 21st wedding anniversary. Technically, we reached adulthood, and should conduct ourselves in line with our adult status… but honestly, especially when things don’t go the way we want them to and disagreements ensue, we can clearly see just how much that’s not the case. Those heated (and hated) squabbles are a perfect mirror to show us how immature we can still be and how much there still remains to learn. We certainly don’t possess the secret to a happy marriage… but that doesn’t mean we haven’t grasped anything in our years together or that we wouldn’t be growing. We are. Every day.

Marriage is hard work. It’s a relationship like no other, and will teach you more about yourself than you’ve ever wanted to know. It will show you just how much power you have over the heart of the other person and what can happen if you’re not careful. Seeing the pain in the eyes of your closest companion hurts… but knowing you’re the one who’s inflicted it, and that you’ll more than likely do it again hurts that much more.

If I know something after all these years, it’s that being happily married is not the same as living happily ever after. Rather, it’s knowing that someone has your back… realizing that you’ve been seen at your worst and you’re still loved. It’s having that safe place next to someone, and even more importantly, trying to be that safe space for someone else. Still learning that one… and feeling like the slowest student at times.

Sometimes it feels like a never ending one step forward and two steps back dance. It can feel tiring and even pointless trying your hardest to build something day after day, only to see it come crashing down a little later. But here is the thing – if you’re lucky enough to have someone who’s willing to pick up the pieces with you and start over, step by step, brick after brick – then after time, the walls will be back up again. And when the sun breaks through the windows, it lets you see just how tall they are and how far you’ve come. Sure, they’re not perfect… who knows, they may even be a tad crooked and there are cracks in them here and there… but it’s your home, home that you’ve built together, and it’s warm and cozy nonetheless.

To David: Thank you for staying in the ring with me.

*****

And since marriage has the power to turn your life upside down… :-),  we celebrated with this fall-ish upside down cake! Pears go phenomenally with walnuts, and the sweet caramel syrup soaked into the cake and together with the poached fruit and buttermilk made the cake super moist. I think next time I might try apples or plums in place of pears; the cake is versatile and I’m sure it’ll be super yummy either way!

img-2016-10-09-7546

Pear Upside Down Cake with Pomegranate Caramel and Walnuts

Cake:
  • 230 g (8 oz.) all-purpose gluten-free flour
  • 1 ½ teaspoon baking powder
  • ½ teaspoon baking soda
  • ½ teaspoon salt
  • ½ teaspoon ground cinnamon
  • ½ teaspoon ginger
  • ¼ teaspoon cardamom
  • ¾ cup finely chopped/coarsely ground walnuts
  • 113 g (4 oz., 8 tablespoons) softened unsalted butter
  • 2 large eggs, 1 separated, 1 left whole
  • 150 g (5 oz.) powdered sugar
  • 1 teaspoon vanilla extract
  • 1 teaspoon fresh orange zest
  • ½ cup buttermilk
Pomegranate Molasses:
  • 2 cups (500 ml) pomegranate juice
  • ¼ cup granulated sugar
  • 2 tablespoons fresh lemon juice
Pomegranate Caramel Syrup:
  • ¼ cup premade pomegranate molasses
  • 3 tablespoons fresh orange juice
  • ¼ cup granulated sugar
  • 2 tablespoons unsalted butter

+ 4 small Bosc pears, peeled, cored, and halved

img-2016-10-09-7548

Method:
  1. First, make pomegranate molasses: In a small saucepan, combine all the ingredients, and cook, stirring occasionally, until the mixture thickens and becomes syrupy, about 3o minutes. Don’t let all the liquid evaporate; watch it closely at the end, so it doesn’t turn into caramel and burn. Let the mixture cool slightly, and transfer it into a glass jar. (The molasses can be made in advance and stored in the refrigerator. Alternatively, you can use store bought pomegranate molasses).
  2. Prepare molasses caramel syrup: In a big shallow pan, combine all the ingredients listed. Cook to melt the butter and dissolve the sugar, about 2 minutes. Add the pears, cut side up, and cook undisturbed until they start to release their juices, about 3 minutes. Turn them over, and cook just until slightly softened, about 3 minutes more. Remove the pears from the syrup and let them cool slightly.
  3. Return the pan to medium heat and cook the liquid until thickened and syrupy, about 3 minutes, depending on the juiciness of the pears. Set the syrup aside.
  4.  Line a 9-inch (22 cm) round springform pan with parchment paper, butter and flour the sides. Preheat the oven to 35o °F (176 °C). Arrange the pears, cut side down onto the parchment in the pan. Pour the caramel syrup over the fruit and chill the springform pan while you prepare the cake batter to set up the syrup.
  5. Prepare the cake batter: Using an electric mixer, whip butter and sugar until light and fluffy. Add in vanilla, orange zest, 1 whole egg, and 1 egg yolk. Lastly, slowly pour in the buttermilk and combine.
  6. In a small bowl, combine dry ingredients except nuts. Whip the egg white until firm peaks form. Fold the dry ingredients into the egg mixture alternating with the whipped egg white. At the end fold in the walnuts. The batter should be fairly thick.
  7. Pour the cake batter carefully over the pears in the pan and smooth out the top. Bake the cake in the preheated oven until the cake tester inserted in the center comes out clean, about 30 minutes. Transfer to a wire rack and let cool in the pan for 15 minutes.
  8. Run knife around edges and open the springform mechanism. Invert the cake onto a plate and carefully remove the parchment paper. Serve with cinnamon whipped cream if desired.

img-2016-10-09-7547


Spiced Honey Plum Cake

The Fall has fallen upon us. I tried to put it off and keep the summer with me for just a bit longer by driving south to the ocean. It was sunny and sticky hot over there, and it felt great walking along the beach listening to the crashing waves and seagulls circling above the water. But even though the temperature still sometimes shoots up pretty high during the day, the mornings are already cold as if the sun wasn’t sure if it wants to roll out of the bed, and even if it decides to honor us with its presence, it goes down way too early. The leaves are turning and summer is slowly but surely passing away. Pretty soon, the sandy beaches, cold drinks, and flowing sundresses will be just a distant memory.

But breezy autumn bursting with colors is still a wonderful season on its own. Mellower than the summer, it is a time of harvest and time of abundance when it comes to fresh produce. I think I love the farmers markets in the fall even more so than during summer. The tables are overflowing with fresh and fragrant fruits and veggies, from squash and sweet potatoes to apples and pears. A true cook and baker’s paradise.

This week’s dessert features plums – sweet autumn delicacies that come in many types and colors. I adore plums with their juicy sweet flesh, contrasted by the tart skin. They’re awesome in every single way: eaten raw, cooked into jams, or baked into tarts and cakes. For baking it’s best to find a less juicy variety, such as Italian plum. When making a plum tart, it’s better to prebake the empty shell and give it a coat of egg white before filling it with fruit. I made a yeast cake, which is sturdier than a tart and thus better equipped to withstand the juiciness of plums, but I still sprinkled the dough spread in the pan with a mixture of cookie crumbs and ground almonds to ensure the cake wouldn’t get soggy. This simple plum cake is baked in every household back home when plums are in season, scented with cinnamon and sprinkled with streusel made from butter, flour, and powdered sugar. I took the basic recipe of my childhood and played with it a bit more: I coated the plums in a mixture of honey, lemon juice and brown sugar before arranging them on the cake, and used a touch of garam masala together with cinnamon to give the cake a wonderful aroma. I think it would be wonderful served with a dollop of brandy whipped cream, but I didn’t get to it – the boys wolfed it down just as it is. Give it a try if you get your hands on some Italian plums – it’s a perfect dessert to usher in Fall 🙂

img-2016-09-12-7534

Spiced Honey Plum Cake

Yeast Dough:
  • 200 g (7 oz.) all-purpose flour (or bread flour)
  • 50 g (1.78 oz., ¼ cup) granulated sugar
  • pinch salt
  • 1 teaspoon fresh lemon zest
  • 1 teaspoon vanilla
  • 50 g (1.78 oz.) unsalted butter, softened
  • 1 egg yolk
  • 150 ml (5 oz.) whole milk, mixed with 1 teaspoon sugar
  • 1.25 teaspoons active dry yeast
Filling:
  • ¼ cup each  ground almonds and cookie crumbs
  • 4 cups Italian plums, pitted and quartered
  • scant ¼ cup honey
  • 1 tablespoon lemon juice
  • 1 tablespoon brown sugar
  • 1 teaspoon cinnamon
  • ¼ teaspoon garam masala
Streusel  Topping (optional):
  • 15 g (2 tablespoons, 1/8 cup) all-purpose flour
  • 15 g (2 tablespoons, 1/8 cup) powdered sugar
  • 15 g (0.5 oz.) cold butter, cubed

img-2016-09-12-7542

Method:
  1. To make the yeast dough, combine lukewarm milk with 1 teaspoon sugar and yeast. Set aside for 10 minutes to activate the yeast.
  2. Place all the remaining ingredients for the dough into the bowl of your stand mixer fitted with a dough hook. When the yeast mixture looks nice and bubbly, add it to the bowl. Knead the dough on a low speed until it comes together and forms a ball. The dough should be soft, smooth, and elastic – if it’s too dry, add in some more milk, 1 tablespoon at a time, if it’s too wet, sprinkle in some flour, 1 tablespoon at a time. Knead the dough for at least 10 minutes. Transfer it into an oiled bowl, cover, and let it rise in a warm spot until it doubles in volume – 50 – 60 minutes.
  3. While the dough is rising, prepare the filling: Pit and quarter the plums. Whisk together honey, lemon juice, brown sugar, and the spices; pour over plums, set aside. Combine ground almonds with cookie crumbs in a small bowl; set aside. Butter and flour a 11 inch (27 cm) springform pan or tart pan.
  4. When the dough has risen, roll it out into a circle and fit it into the prepared pan. You can vary the thickness of the dough according to your preference – the thinner dough will produce a crisper cake. Discard the leftover dough. Sprinkle the dough with almond/cookie crumb mixture.
  5. Strain the extra juice from the plums and arrange them on the cake, pressing them slightly into the dough. Cover the cake and let it rise at a room temp again while you preheat the oven to 375 °F (190 °C).
  6. Make the streusel topping, if using: Combine flour, sugar, and butter, and mix them with your fingers into coarse crumbs. Sprinkle topping over the fruit.
  7. Bake the cake until the bottom is golden brown and the plums are soft, about 35 minutes. Let cool before serving. Serve with brandy whipped cream if desired.

Vanilla Cake with Sour Cream Yogurt Frosting and Fresh Fruit

September is a celebration month at our house. No, I don’t celebrate the boys going back to school… 🙂 Truth to be told, I’ve gotten used to the extra chatter, extra pairs of hands, not to mention the extra sleep I’ve been getting in the mornings. I’m always a little nostalgic at the end of August – I’m a summer girl at heart, and even though I enjoy the fall here in the Pacific Northwest and love the beautiful color show the turning leaves put out every year, I know we won’t be able to escape the rain that’s coming after. But as fate would have it, all my men were born in September (two within days of each other!), and so we can’t really be too sad about summer being over around here, because we’re too busy counting down until someone’s birthday.

Birthday is always a highlight of a person’s year, I suppose, regardless of the day it falls on. Having said that, growing up I always felt a little sorry for the kids whose Christmas and birthday were rolled into one… I couldn’t help but feel they were a bit cheated. But early September Birthday? Awesome! It’s not so hot anymore that you have to worry about the buttercream frosting melting and the cake you spent hours on falling apart before your guests even finish singing Happy Birthday, but you can still celebrate outside and won’t get drenched or freeze to death. Oh, and if you were born in September, you can have your cake and eat it too! Just think about it – the bikini season is over, no need to fret over some fat around your waistline. Any potential muffin top can be easily and comfortably hidden under those wonderfully loose fall sweaters.

Not that it would ever occur to my men (or any man, really!) to worry about something like that. Mr. Photographer asked for a light fruity cake, and I’m sure he didn’t go for it just because the contrasting berries and grapes would look good in pictures. If he sees cake (or cheese! or wine!), you bet he’s going to have some, even if it’s five minutes before midnight. He truly is a carpe diem person, and I love that about him. The cake I made for him (and my other man-son that almost shares birthday with his father) is rather simple: Lemon scented vanilla cake with yogurt – sour cream filling, filled with summer fruit galore. This kind of cake is quite often baked back home during summer, and for a very good reason – it’s simple and quick to make, a little sweet, a little tart, and a whole lot creamy. Go bake some, and then cut yourself a slice, put your feet up, and enjoy life: every day of it it’s delicious, and on your birthday it holds true twice as much!

 img-2016-09-04-0373-Edit

Vanilla Cake with Sour Cream Yogurt Frosting and Fresh Fruit

Cake:
  • 4 eggs, room temp, separated
  • 120 g (4 oz.) powdered sugar
  • 100 ml (3.3 oz.) mild tasting oil (melted & cooled butter)
  • 2 teaspoons fresh lemon zest
  • 2 teaspoons vanilla
  • 100 g (3.5 oz.) all-purpose gluten-free flour
  • 1 teaspoon xanthan/guar gum (omit if your mix contains it already)
  • 1 pkg. Dr.Oetker Vanilla Pudding (37 g), or other powdered gluten-free pudding by weight
  • ½ teaspoon salt
  • 10 g (0.35 oz.) baking powder
  • ½ teaspoon cream of tartar
Filling:
  •  500 ml (about 2 cups) full-fat sour cream
  • 250 ml (8 oz., about 1 cup) full-fat Greek yogurt (yogurt and sour cream can be used interchangeably)
  • 2 teaspoons vanilla
  • 60 g (over 2 oz.) powdered sugar
  • 300 ml (10 oz.) heavy whipping cream
  • 20 g (almost 3 pkg.) Knox powdered gelatin
  • 100 ml (3.3 oz.) cold water
Lemon Syrup:
  • ¼ cup water
  • ¼ cup white sugar
  • 1/3 cup lemon juice
Gelatin Glaze:
  • 1 pkg. Knox unflavored gelatin
  • ¼ cup cold water
  • ¼ cup very hot water
  • 1 tablespoon liquid honey
  • 1 tablespoon lemon juice

+ ¼ cup apricot preserves, to spread on the cake before fruit and filling
mixed fruit of your choice for filling the cake and for decoration (I used 2 sliced bananas and 2 cups sliced strawberries inside the cake, and decorated with peaches, blueberries, grapes, and strawberries

img-2016-09-03-6420

Method:
  1. For the cake, line a 26 cm (10-inch) round springform pan with parchment paper. Butter the sides of the pan. Preheat the oven to 350 °F (176 °C).
  2. In a medium bowl, whisk together flour, pudding powder, and baking powder. Set aside.
  3. In a bowl of your stand mixer, whisk the egg yolks with sugar until very thick and light yellow in color, about 10 minutes. Gradually start adding the oil (liquid butter), whisking constantly. Mix in the lemon peel and vanilla. Set aside.
  4. Whip the egg whites with salt and cream of tartar until firm peaks form.
  5. In three additions, fold the flour mixture into the egg yolk mixture alternatively with the whipped egg whites. (Take care not to deflate the egg whites.) Pour the mixture into your prepared pan, smooth out the top, and bake for about 20 – 25 minutes until the cake pulls away from the sides of the pan, and the toothpick inserted into the center comes out clean. Let the cake cool in the pan for 5 minutes, and then transfer it onto a cooling rack and let it cool completely. Wash the springform pan and set it aside.
  6. While the cake is cooling, cook a simple lemon syrup: Bring the water with sugar to a boil, and mix in the lemon juice. Let cool. (The syrup can be made in advance and refrigerated; I used about half and reserved the rest for later).
  7. When the cake is cool, remove the dome from the top if any, and return the cake into the springform pan lined with clean sheet of parchment. Spoon the syrup over the cake to moisten it, and spread the cake with apricot preserves. Cover the cake with sliced bananas.
  8. Prepare the filing: Combine gelatin powder and water in a small bowl; let stand for 10 minutes to bloom. Mix yogurt and sour cream together until well combined and no lumps remain; add in sugar and vanilla, and combine. In a separate bowl, whip the cream until firm peaks form; carefully fold the whipped cream into the yogurt-sour cream mixture.
  9. Heat the gelatin mixture in a water bath until very hot and the gelatin dissolves, stirring constantly. Do not boil, or the filling won’t set. Add 3 tablespoons of the filling into the hot gelatin to temper it, and pour it back into the remaining filling. Mix well. Pour about half of the filling onto the cake in the pan, covering the bananas. Put into the refrigerator for couple of minutes to partially set the filling. Leave the remaining filling on the counter so it remains pourable.
  10. Cover the partially set filling with sliced strawberries, and pour the rest of the filling on top. (I had some filling left over.) Refrigerate for couple of hours (up to overnight) to set the filling completely.
  11. Decorate the cake with fresh fruit. Make the gelatin glaze: Combine gelatin with cold water, and set it aside to bloom. Add in the hot water, honey, and lemon juice, and whisk until the gelatin is completely dissolved and the mixture looks clear. Put the mixture into the fridge for couple of minutes, stirring occasionally. When the gelatin mixture has a consistency of raw egg whites, spoon it carefully over the fruit on the cake (I used a paintbrush). Let the gelatin set.
  12. Remove the cake from the springform pan, and place it onto a serving plate. Decorate the cake with additional whipped cream if desired and serve.

img-2016-09-04-6435

Cantaloupe – Peach Preserves and Boozy Fig Jam

I have a confession to make: I’m not a gardener. Plants and I simply don’t mesh. There are all these studies out there saying gardening is good for you, how digging in the dirt leads to a strong immune system and a better mental health… But alas, despite to being born to avid gardener parents, I was definitely endowed with a brown thumb… or two. My aunt, whose apartment looked like a jungle full of luscious green foliage plants, used to say that the secret is to talk to your plants. It was an interesting theory… but the more I thought about it, the less I was sure I was buying it. I mean, I talk to my kids, and have been doing so for years… prattling on and on about how to behave and what I thought they should be doing and why. In the end they pretty much always did what they wanted anyway. So if the offspring, flesh of my flesh and blood of my blood don’t listen, why should I believe some shrubs from the Home Depot would?!

But talking or not talking method aside, I’ve tried many things to overcome this shortcoming: I tried to buy hardy plants, supposedly able to withstand unintentional manhandling. I tried to water them more and water them less; give them attention, or give them space and let them do their thing… but “their thing” in my care always seemed to just be dying. Sometimes fast and sometimes slow, but eventually I always managed to kill them all. They say the first step to overcome anything is to embrace the truth, so I may just as well come out and say it like it is: Hi, I’m Daniela, and I am a prolific plant killer. I’ve come to terms with this; in fact, we all have. Instead of flowers, Mr. Photographer buys me chocolate, and if he does bring me a potted plant from time to time, we have an unspoken agreement it will be up to him to take care of it for me. I enjoy admiring its beauty from a safe distance, casting furtive glances at it from the other room, but won’t dare to come much closer.

I rather stick to doing what I’m good at, which is processing the fruit of edible plants somebody else managed not to do in. I enjoy walking through farmers markets on lazy Saturday mornings, looking at all the beautiful abundance Mother Nature decided to give us, touching and smelling it, and then bringing some of it home and transforming it into something else. And this weekend, we’re jamming, which is probably my most favorite way of succulent produce transformation. Jam making is easy, relatively fast, and I get to play and come up with new and unusual yummy combinations. Plus, my men like pancakes 🙂 Here is a glimpse of what I made: The first one is a peach and cantaloupe jam, which turned out the most beautiful sunny yellow color. It’s also a little runnier (probably thanks to the cantaloupe and its high water content), and therefore awesome to spread on crepes. The boozy fig one is the real winner though. Sweet and a little tart, with just a hint of cinnamon. I threw in some fresh lemon peel and divided the brandy in half – half was poured into the fruit right at the start and left to macerate, and the second half I added at the end of cooking (I didn’t want all that boozy goodness to evaporate!) We tried it right away on some grilled cheese sandwiches, and although it may seem like an odd combination, it was delish! If you decide to only try making one jam this year, this should be it!

img-2016-08-28-6404

Cantaloupe – Peach Preserves and Boozy Fig Jam

Cantaloupe – Peach Preserves

(makes about four ½ – pint jars)

  • 450 g (1 lb.) peeled and seeded cantaloupe, diced
  • 450 g (1 lb.) yellow peaches, stoned, peeled, and diced
  • 4 tablespoons fresh lemon juice
  • ½ cup (125 ml) fresh orange juice
  • 300 g (10.5 oz.) granulated sugar
  • ½ teaspoon ground anise
Method:
  1. Process the cantaloupe and peaches in a food processor or a blender. Pour the mixture into a deep saucepan.
  2. Add in the remaining ingredients, and bring the fruit to a boil. Cook, stirring almost constantly, for about 20 minutes, until the jam thickens to your liking. (For more info about how to know if the jam is ready, see this Mirabelle Ginger Jam post).
  3. Ladle the hot jam into clean ½ – pint glass jars, leaving about ¼ – inch space at the top. Remove any air bubbles. Wipe jar rims with clean damp cloth. Cover with hot lids; apply screw bands. Process the jars in a pot of boiling water for 15 minutes.
  4.  Remove the jars from the water and let them cool upside down. Store the jam in a dark, cool place for up to a year.

img-2016-08-28-6410

Boozy Fig Jam

(adapted from http://www.epicurious.com; makes about six ½ – pint jars)

  • 2 kg (4 lbs.) fresh purple figs, divided
  • zest from 1 organic lemon
  • 10 tablespoons (about ½ cup) fresh lemon juice (to taste)
  • 4 cups (about 800 g, 28 oz.) granulated sugar
  • ½ teaspoon coarse kosher salt
  • 1 teaspoon ground cinnamon
  • 3/4 cup (about 175 ml) brandy or cognac
Method:
  1. Process half of the cleaned and stemmed figs in a blender. Cut the remaining figs into ½ – inch (1 cm) pieces. Transfer all the figs into a deep big saucepan. Add in the sugar, lemon juice & zest, cinnamon & salt, and half of the brandy or cognac. Mix together, cover, and let stand at room temp for 1 hour.
  2. Bring the mixture to a boil, and cook, stirring often, for about 30 – 35 minutes, until the jam thickens, breaking up the large fig pieces into smaller bits. Add the remaining brandy or cognac at the end. Remove from heat.
  3. Ladle the hot jam into clean ½ – pint glass jars, leaving ¼ – inch space at the top of the jars. Remove any air bubbles and wipe the rims with a clean damp cloth. Cover with hot lids; apply screw bands.
  4. Process in a pot of boiling water for 15 minutes. Cool jars completely turning them upside down. Store in a cool dark place for up to a year.